alfred@aridbilge.com

About Alfred Baurley

Alfred Baurley is the President of Arid Bilge Systems, a marine technology company dedicated to keeping boat bilges dry, fresh, and protected through advanced vacuum-based bilge drying systems. Arid Bilge Systems was originally founded more than 22 years ago by Alfred’s father, Al Baurley, an engineer and lifelong boater who developed the original concept after seeing firsthand the damage caused by standing bilge water, then developing the first piolet model on the boat he built (Thirsty Lady V) with his father Al Baurley Sr. Alfred joined the company shortly after college and has spent the last 12+ years helping evolve Arid from a small, hands-on operation into a worldwide recognized marine technology brand trusted by boat owners, dealers, and builders across the United States and world. Early on, Alfred was deeply involved in real-world installations—working on the front lines installing Arid Systems and seeing the damage upfront from standing bilge water in engine rooms, bilge gel coats, bow/ stern thrusters, and generators on all vessels he walked on. It was during these installations that the need for Arid’s technology became undeniable. On nearly every boat, Alfred observed the same hidden problem: foul, stagnant water trapped in low areas and crevices—slowly causing odor, corrosion, mold, and long-term damage to critical onboard systems. Costing boat owners' tens of thousands of collective damages over a few years' time. Seeing this problem repeatedly, Alfred made the decision to leave college and fully commit to building Arid Bilge Systems alongside his father. Starting in a garage and growing step by step, they refined the original concept into smaller, more efficient, and more reliable systems suitable for a wide range of vessels. While the early days required patience and persistence—introducing a vacuum-based bilge system to a market accustomed to traditional bilge pumps—the technology consistently proved itself in the field for many years. Over time, Arid Bilge Systems developed a loyal following. Many customers initially approached the system with hesitation, only to later describe it as “one of the best things on the boat.” Builders, service professionals, and owners alike recognized that Arid wasn’t just removing water—it was protecting engines, generators, living spaces, and long-term vessel value. Today, Alfred leads Arid Bilge Systems with a focus on business development, engineering dealer/builder support, and long-term reliability. He is widely regarded in the marine industry as a go-to expert on bilge moisture management and vacuum-based drying systems. Under his leadership, Arid has earned 5-star customer reviews, built strong dealer/builder relationships nationwide, and continues to expand its presence with boat builders, service yards, and certified installers. Alfred remains personally involved in product development, dealer training, and customer support—continuing the legacy started by his father while guiding Arid Bilge Systems into its next phase of growth.
11 10, 2026
  • Out-A-Line, a Viking 61 sportfishing yacht, photographed on blue water.

Out-A-Line: An Arid Series 2 Installation Aboard a Viking 61

By |2026-10-15T19:56:37+00:00October 11, 2026|Blog, Boat Stories, Fishing Boats, Installation Stories|

Aboard Out-A-Line, a 61-foot Viking sportfishing yacht, the Arid installation centers on a Series 2×2 24-volt unit. The original photographs show the boat on blue water and the cabinet fitted below deck.

A Viking sportfisher with space below deck

This 2005 Viking 61 has a three-stateroom, three-head layout. The exterior photograph captures its tall fishing tower above the enclosed cabin; the installation photograph offers a closer look at one part of the equipment arrangement below.
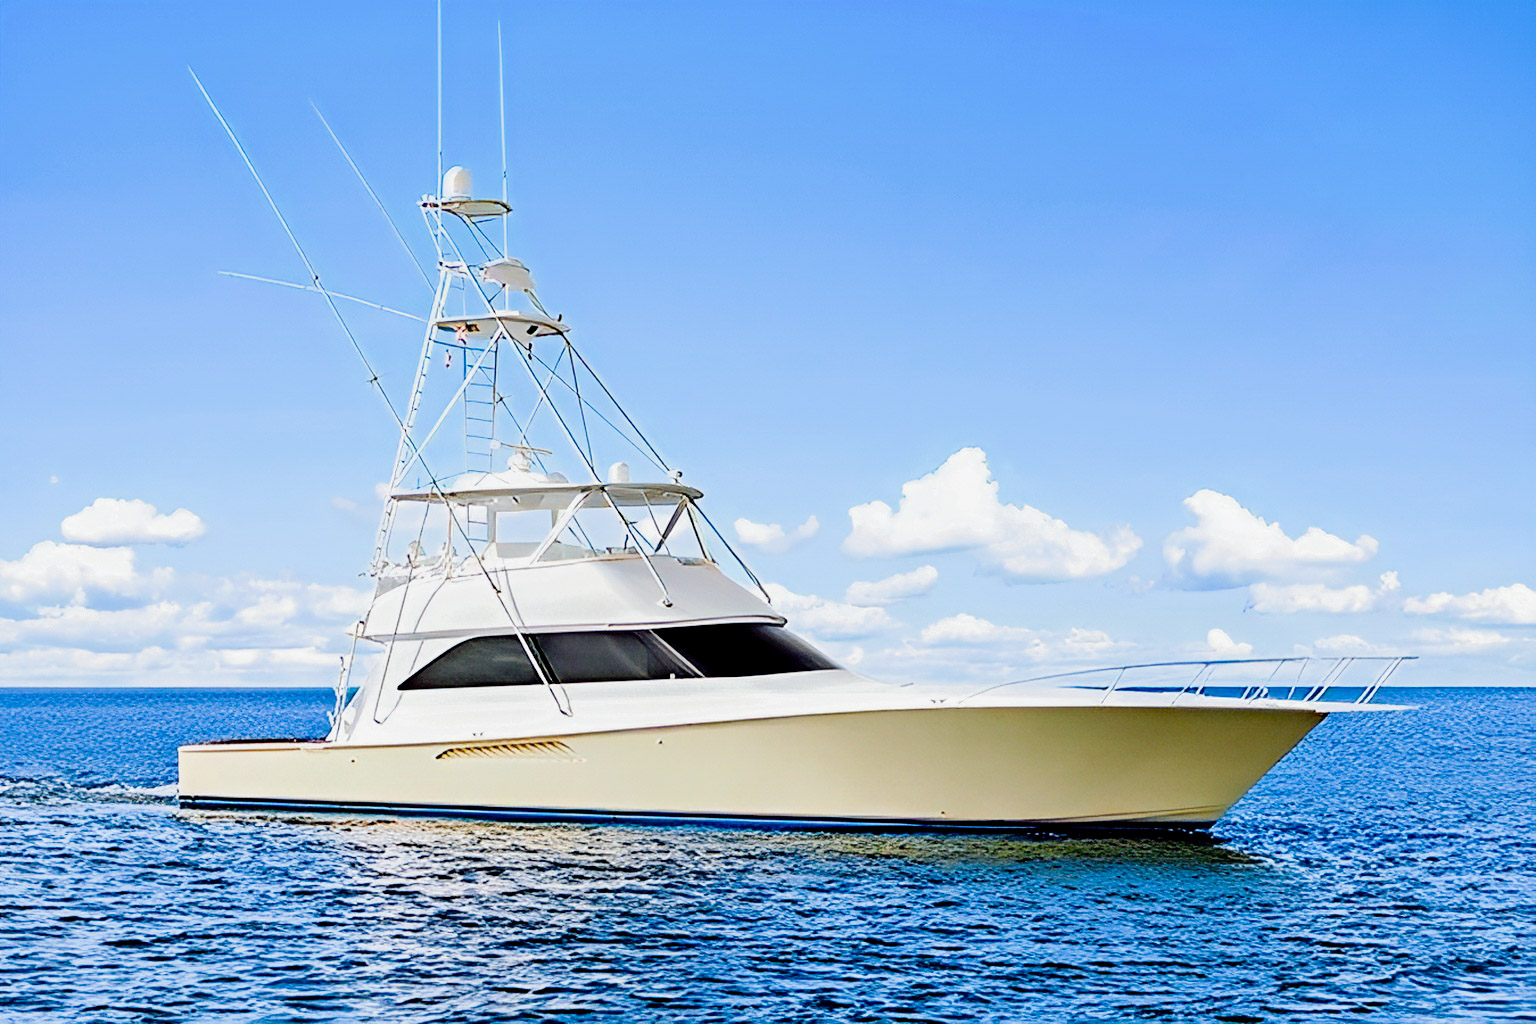
Out-A-Line, a Viking 61 sportfishing yacht, photographed on blue water.
Out-A-Line, a 2005 Viking 61 sportfishing yacht.

Out-A-Line’s Series 2 installation

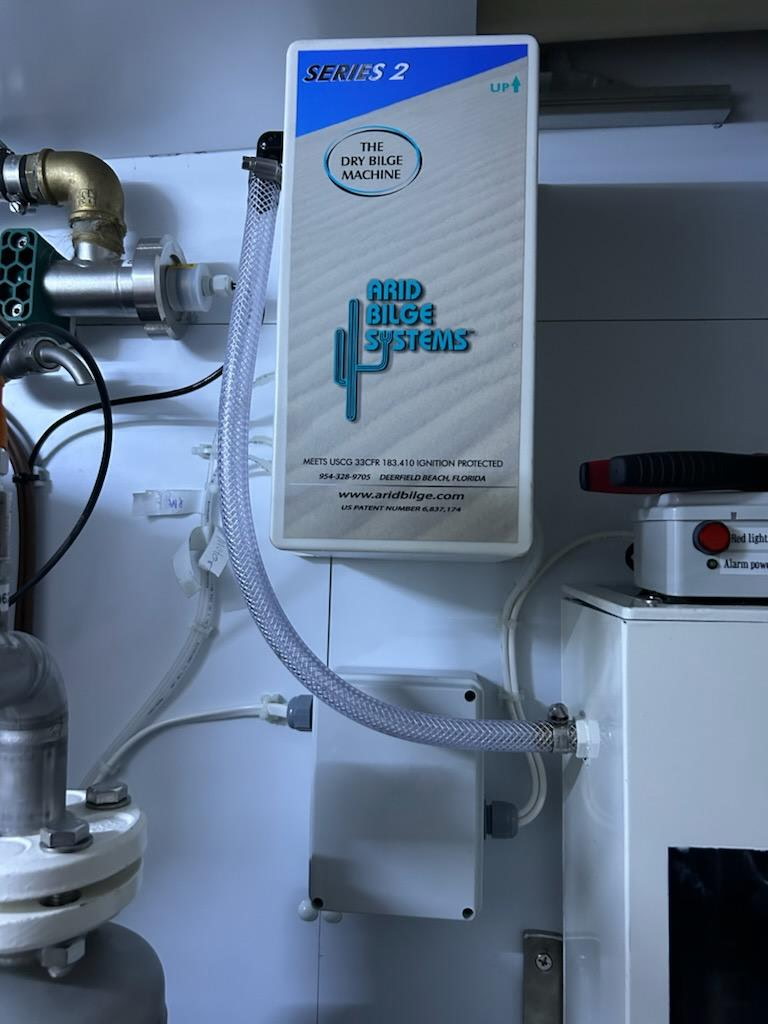
The equipment photograph shows a slim Series 2 cabinet mounted against a bulkhead, with its front panel facing into the compartment. Connected tubing runs beneath it, alongside the larger hoses already aboard.

Arid Series 2 cabinet installed aboard Out-A-Line.
The Arid Series 2 cabinet aboard Out-A-Line.

Our original feature identifies a two-zone setup. Those zones describe the installation featured here; they are not a recommendation based solely on the boat’s length. Pickup locations should follow the actual places where water collects.

A two-zone installation brings two collection areas back to one cabinet. The useful detail here is that a 61-foot boat is documented with a Series 2 setup: hull length alone does not tell an installer how many separate wet points need attention. The layout, drainage paths and chosen collection areas decide that conversation.

The water that remains

Arid’s role is to collect shallow residual water from connected low points. Conventional bilge pumps remain responsible for higher-volume pumping, and recurring water still calls for an inspection of its source.

The close view of the cabinet also shows why installation photographs are worth keeping. A clear view of the panel and the surrounding connections can help an owner explain the arrangement when requesting service or planning later work. Include the tubing route and access opening in your own installation records, along with the model and power-supply details.

For owners planning a similar installation, a look below deck is more useful than a size comparison alone. Identify separate wet areas, check tubing routes and leave room to reach the equipment for inspection and service.

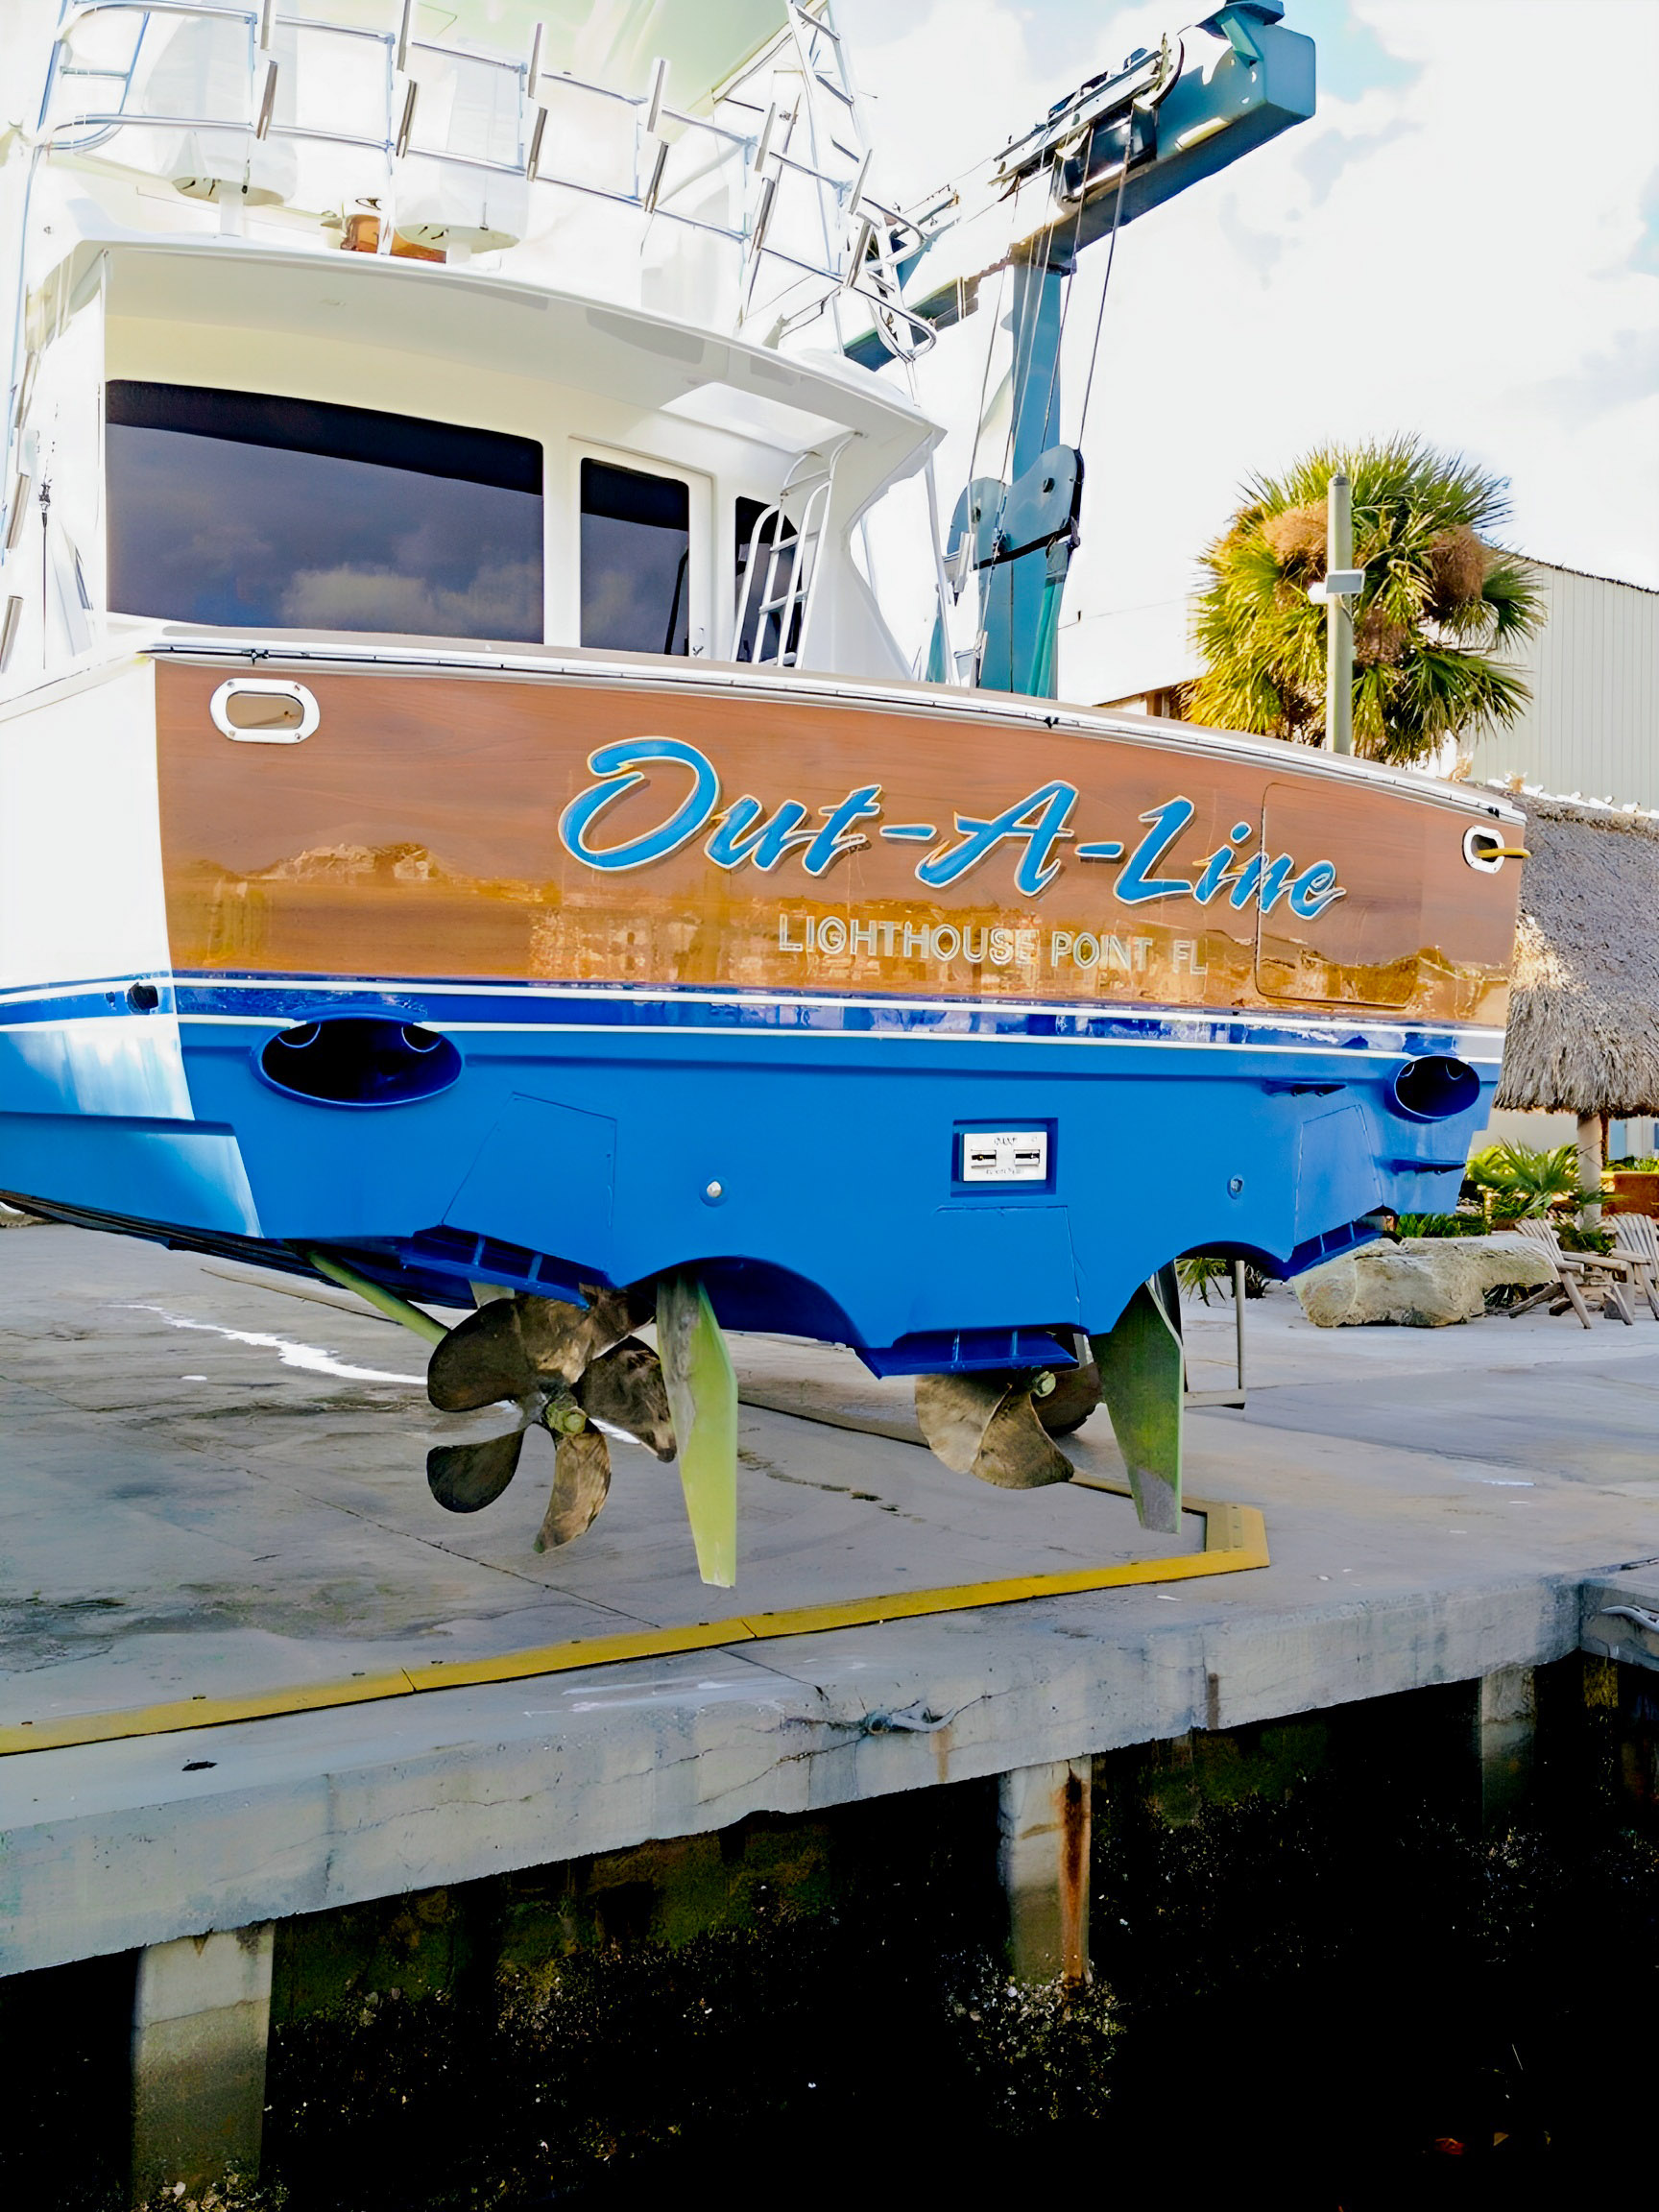
Out-A-Line’s named stern and fishing tower at the dock.
Out-A-Line at the dock, as shown in the original company feature.
Out-A-Line’s named stern, propellers and hull while the yacht is ashore.
The named stern in another photograph from the original Out-A-Line feature.

See the original Out-A-Line feature and photographs, learn how Arid works, browse the Arid product range, or discuss the layout of your boat with our team.

More sportfishing installations

11 10, 2026
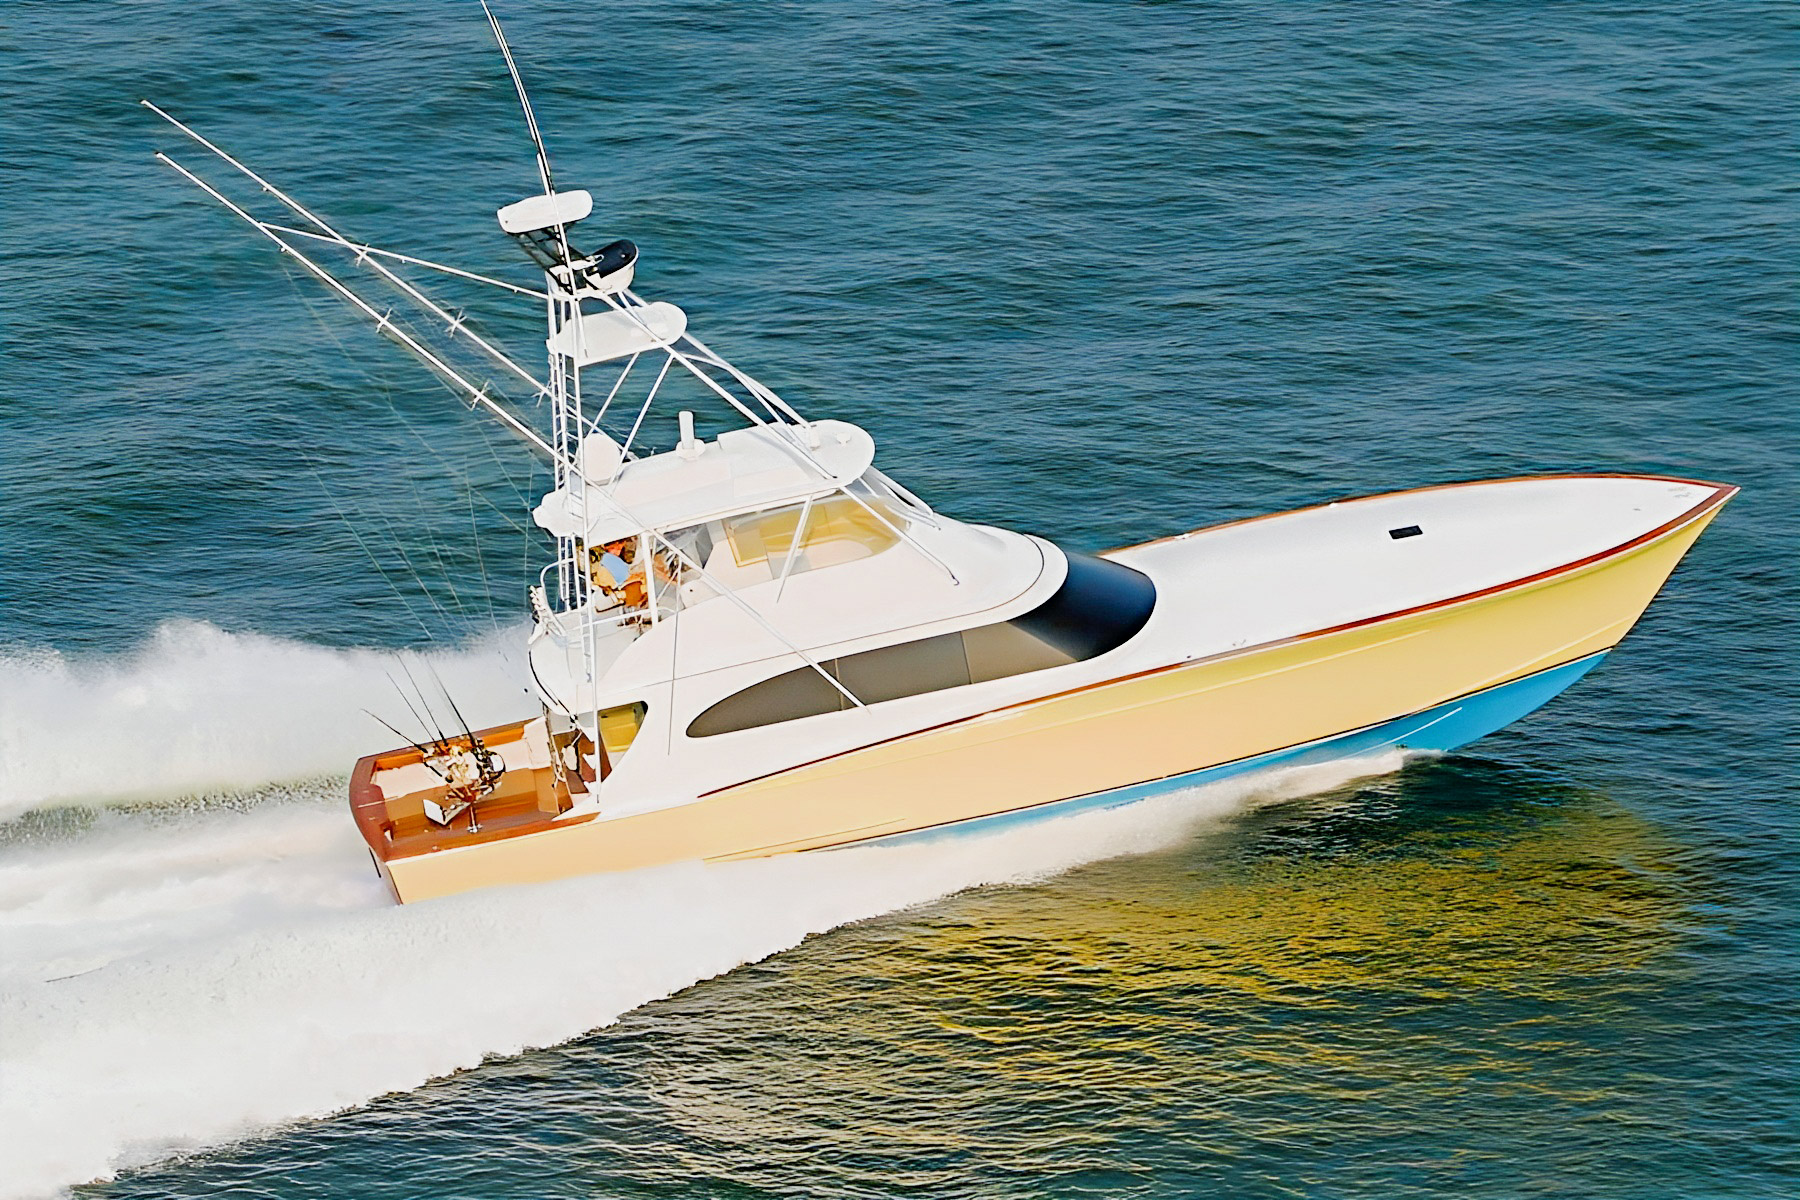
  • Gratitude, a yellow-hulled Spencer sportfishing yacht, underway.

Gratitude: An Arid Installation Aboard a 66-Foot Spencer

By |2026-10-15T19:56:10+00:00October 11, 2026|Blog, Boat Stories, Fishing Boats, Installation Stories|

With her yellow hull, tower and long foredeck, Gratitude is easy to pick out underway. Below deck, the 66-foot Spencer convertible sportfish carries an Arid Series 4×4, installed forward in the engine room.

Gratitude, a yellow-hulled Spencer sportfishing yacht, underway.
Gratitude, the 66-foot Spencer featured in Arid’s original installation post.

A Carolina sportfisher from Spencer Yachts

Gratitude is a 66-foot convertible sportfisher built by Spencer Yachts in Wanchese, North Carolina. Spencer’s boats carry the Carolina sportfishing tradition into custom yachts designed around fishing and time offshore. Gratitude’s tower, open cockpit and long foredeck make that purpose clear in the exterior photograph.

The machinery spaces deserve the same care as the visible finishes. Reaching residual water beneath and around equipment helps keep those less accessible areas ready for inspection. A dry-bilge system is one part of that maintenance routine, fitted to the individual boat’s drainage and pickup locations.

Forward in Gratitude’s engine room

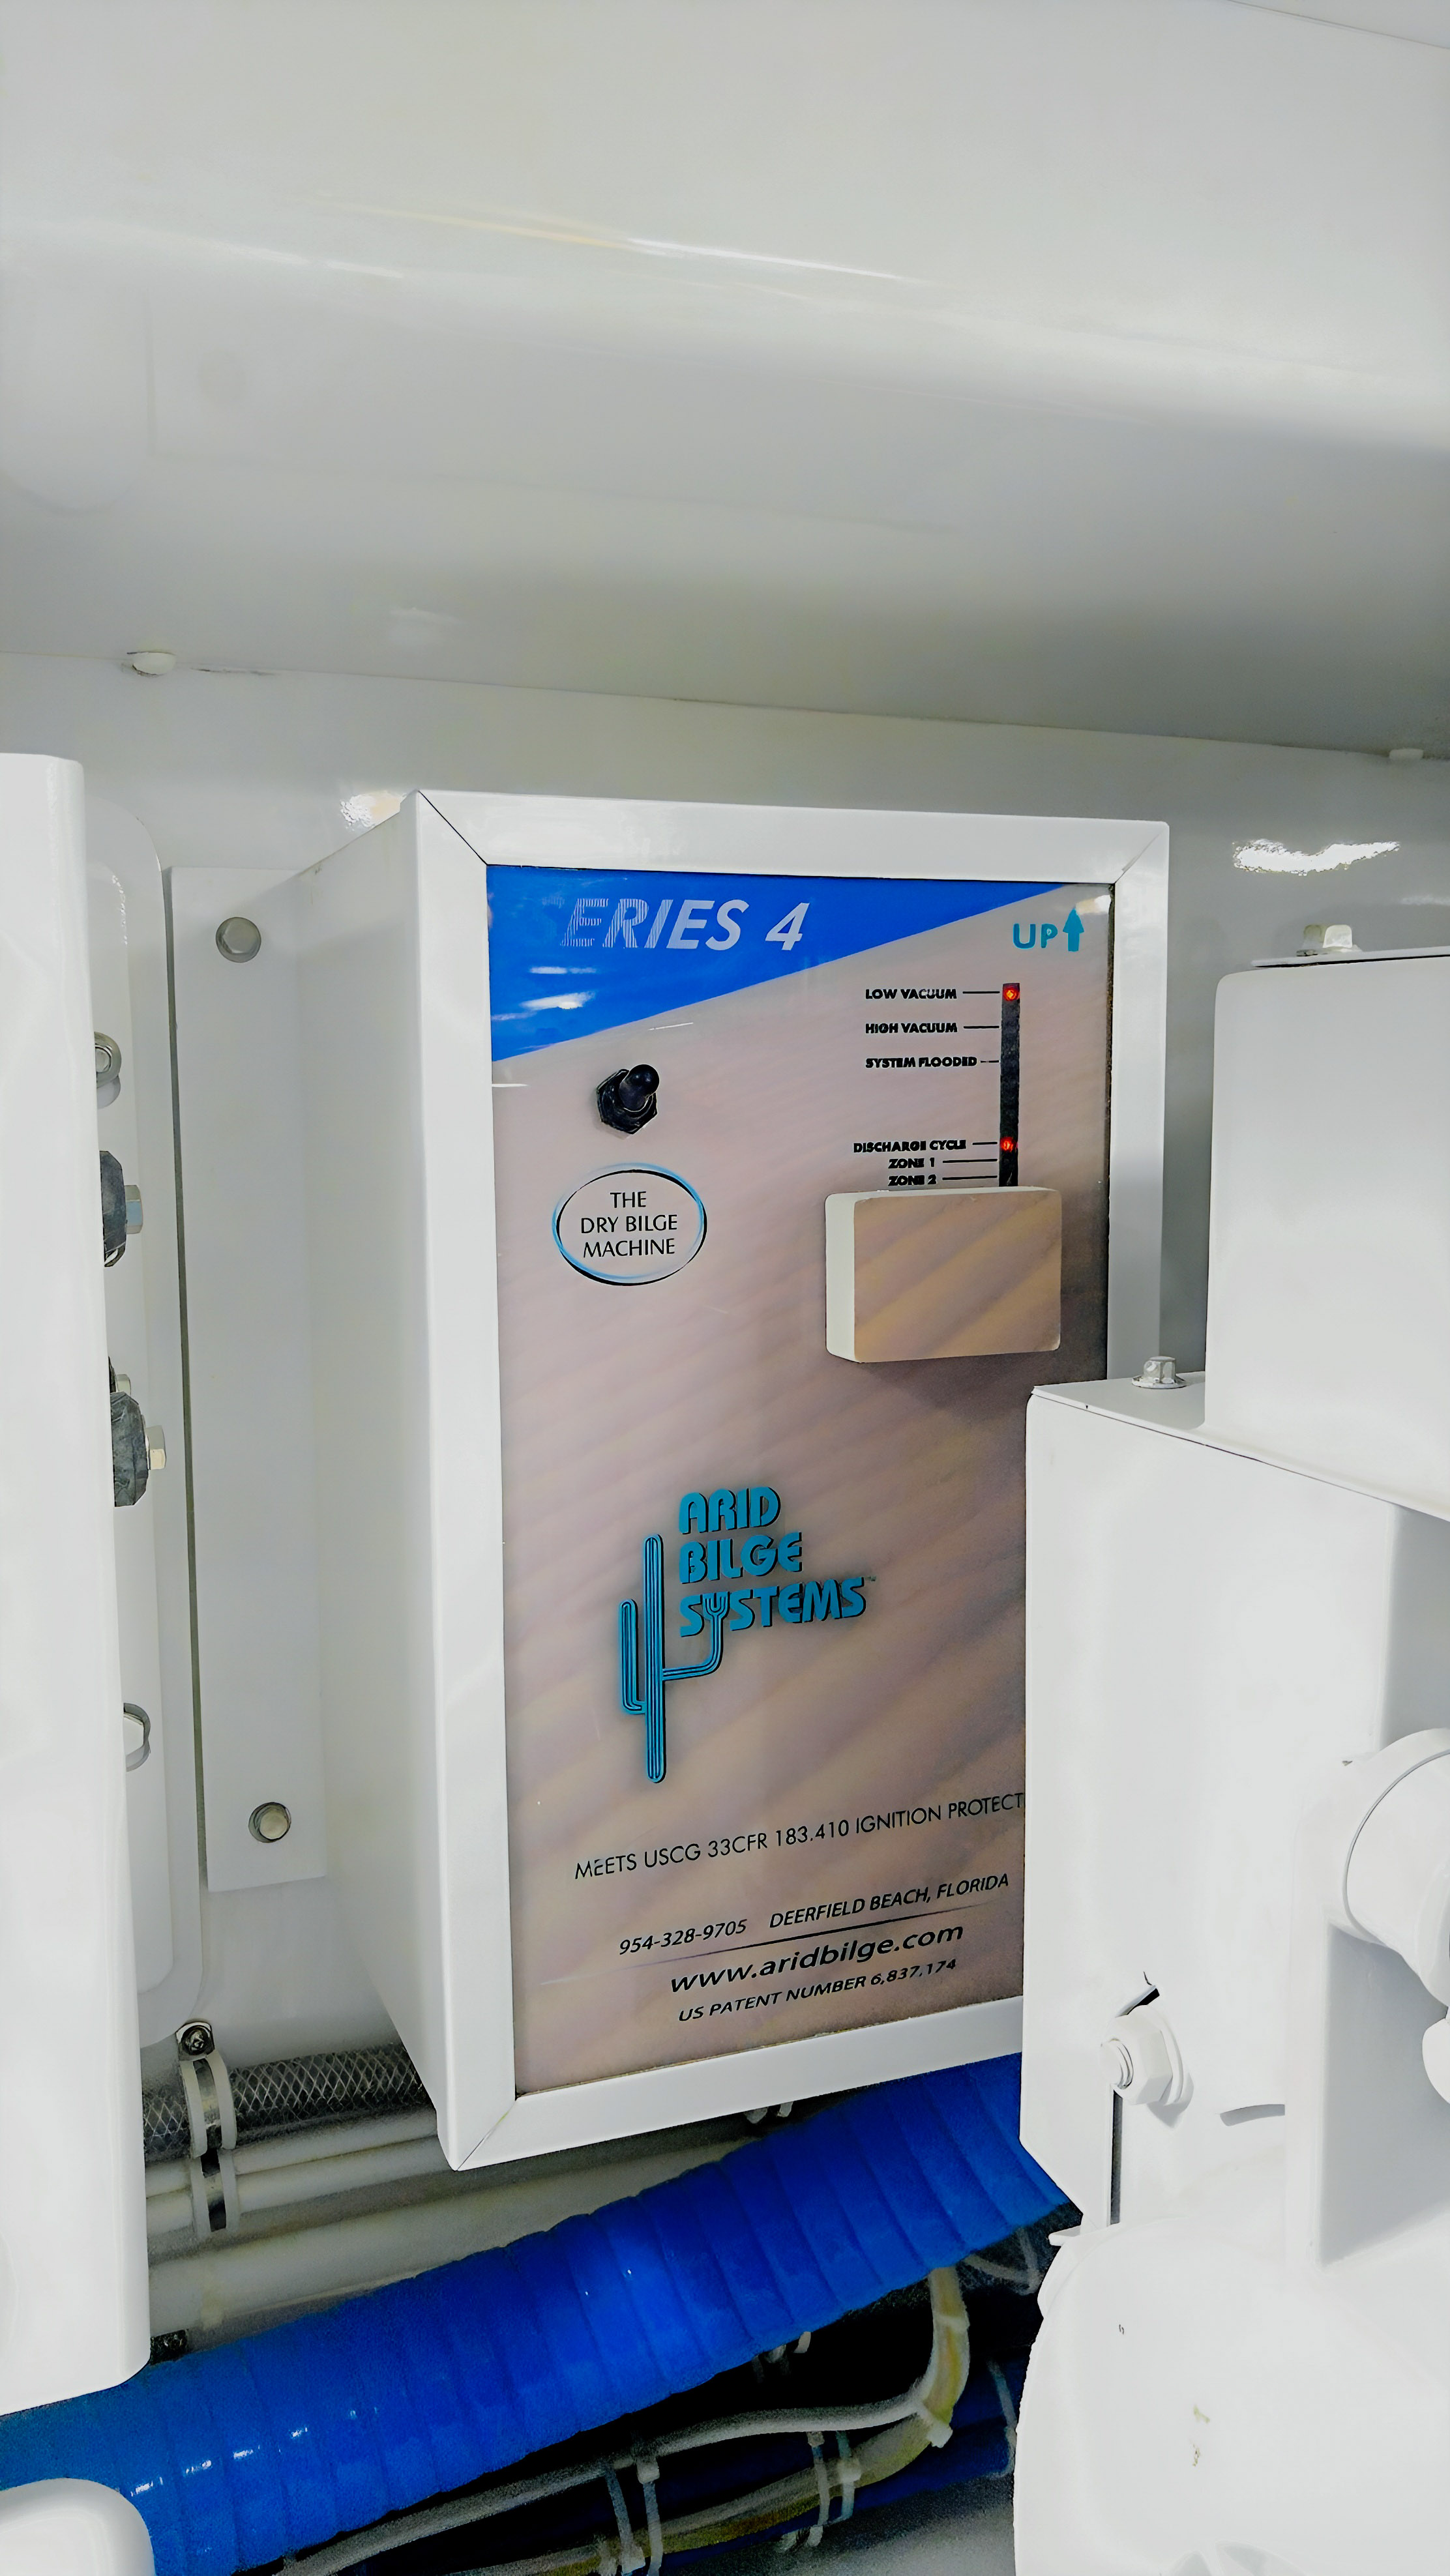
The installation photograph gives a close view of the Series 4 cabinet among the yacht’s machinery. Its blue-topped front panel, control and indicator lights face into the compartment. A large blue hose passes beneath the cabinet, while other equipment stands close beside it.

That view shows how a drying unit becomes part of an existing engine room. Its location is separate from the places it serves: pickup tubing connects the cabinet to low points where residual water collects.

Arid Series 4 cabinet installed forward in the engine room aboard Gratitude.
The Series 4 cabinet forward in Gratitude’s engine room, as shown in the original Arid feature.

Follow the water before choosing pickups

A wet point can be a small pocket of water left after drainage and ordinary pumping. It does not have to mean an entire flooded compartment. Several pockets can need separate attention if water cannot drain freely between them.

For a sportfisher with machinery, hoses and structural divisions below deck, tracing those pockets is a useful first step. Look for the places that remain wet, note whether they communicate with one another, and check how each can be reached. A photograph of the cabinet alone cannot map that work.

Gratitude’s forward engine-room installation provides a concrete example of a cabinet location. Another boat’s pickup plan should come from its own layout, with conventional bilge pumps retained for higher-volume pumping. If water repeatedly returns, investigate its source as well as removing what remains.

Leave room for the next inspection

The close installation view also puts service access in perspective. Before fitting a cabinet into a similar space, consider whether someone can read its indicators, reach its controls and connections, and carry out the maintenance described in the model’s manual. Include the surrounding equipment in planning photographs so those clearances are visible.

Compare the current Series 4 product information with your requirements; Gratitude’s photographed installation records its own configuration. For another sportfishing setup, see the Series 2 installation aboard Out-A-Line.

View Gratitude’s original exterior and engine-room photographs, learn how Arid collects residual bilge water, or discuss your sportfisher’s installation with our team.
Explore current Arid systems.

11 10, 2026
  • Reef Chief motor yacht underway on blue water.

Reef Chief: Two Arid Systems Aboard a 120-Foot Motor Yacht

By |2026-10-11T04:01:58+00:00October 11, 2026|Blog, Boat Stories, Installation Stories, Motor Yachts|

Seen underway, Reef Chief presents the long profile of a 120-foot motor yacht. Below those decks, our original boat feature records an Arid Series 9 and a Series 4, together with a Deckma Hamburg oil monitoring system. The exterior and installation photographs show two sides of the same yacht: the boat at sea and the installation below deck.

Reef Chief motor yacht underway on blue water.
Reef Chief underway, from the original Arid boat feature.

A Lloyds Ships yacht across three decks

Built by Lloyds Ships, Reef Chief arranges living and working spaces across three decks. The pilothouse and sky lounge occupy the upper level; the owner’s stateroom and main living areas sit below. Guest accommodation, crew quarters and the engine room are among the lower-deck spaces described in Denison’s historical profile of Reef Chief.

The layout puts bilge care in context. Alongside the rooms people use are machinery spaces, plumbing and low points that need their own attention. A yacht’s overall length tells only part of that story.

Series 9 and Series 4 aboard Reef Chief

The two Arid units address residual water through connected pickup locations. Instead of carrying a portable vacuum to each wet area, the installation brings tubing back to central collection equipment.

In the installation photograph, the clear-front enclosure reveals a black control panel, a gauge and tubing running along the right-hand side. It is a close view of the installed hardware among the yacht’s other equipment. Controls, hoses and connections are all part of the space that must remain accessible for inspection and service.

Arid equipment in a clear-front enclosure aboard Reef Chief, with gauges and tubing visible.
Arid equipment aboard Reef Chief, shown in the original installation photograph.

Water collection and oil monitoring have different jobs

The Deckma Hamburg monitoring system named in the original feature adds a separate function to the installation. Collecting bilge fluid does not separate oil from water or establish that the fluid is suitable for discharge. The discharge and monitoring arrangements therefore belong in the same planning conversation as the drying equipment.

Conventional bilge pumps remain essential for higher-volume pumping. Arid supplements them by collecting the shallow water that can remain at the connected low points.

What to take from this installation

Reef Chief shows that an installation can include more than one Arid cabinet. The useful question for another owner is which wet areas need collection, where the equipment can fit and how it can be serviced. Two cabinets aboard this yacht do not make two cabinets the right choice for every 120-footer.

See the original Reef Chief feature and photographs, or talk with our team about your boat’s layout.

Related reading

Explore current Arid systems.

11 10, 2026
  • Cortina underway, viewed from above and astern in an original Arid Bilge Systems photograph.

Cortina: Bilge Drying Aboard a 114-Foot Motor Yacht

By |2026-10-11T04:01:28+00:00October 11, 2026|Blog, Boat Stories, Installation Stories, Motor Yachts|

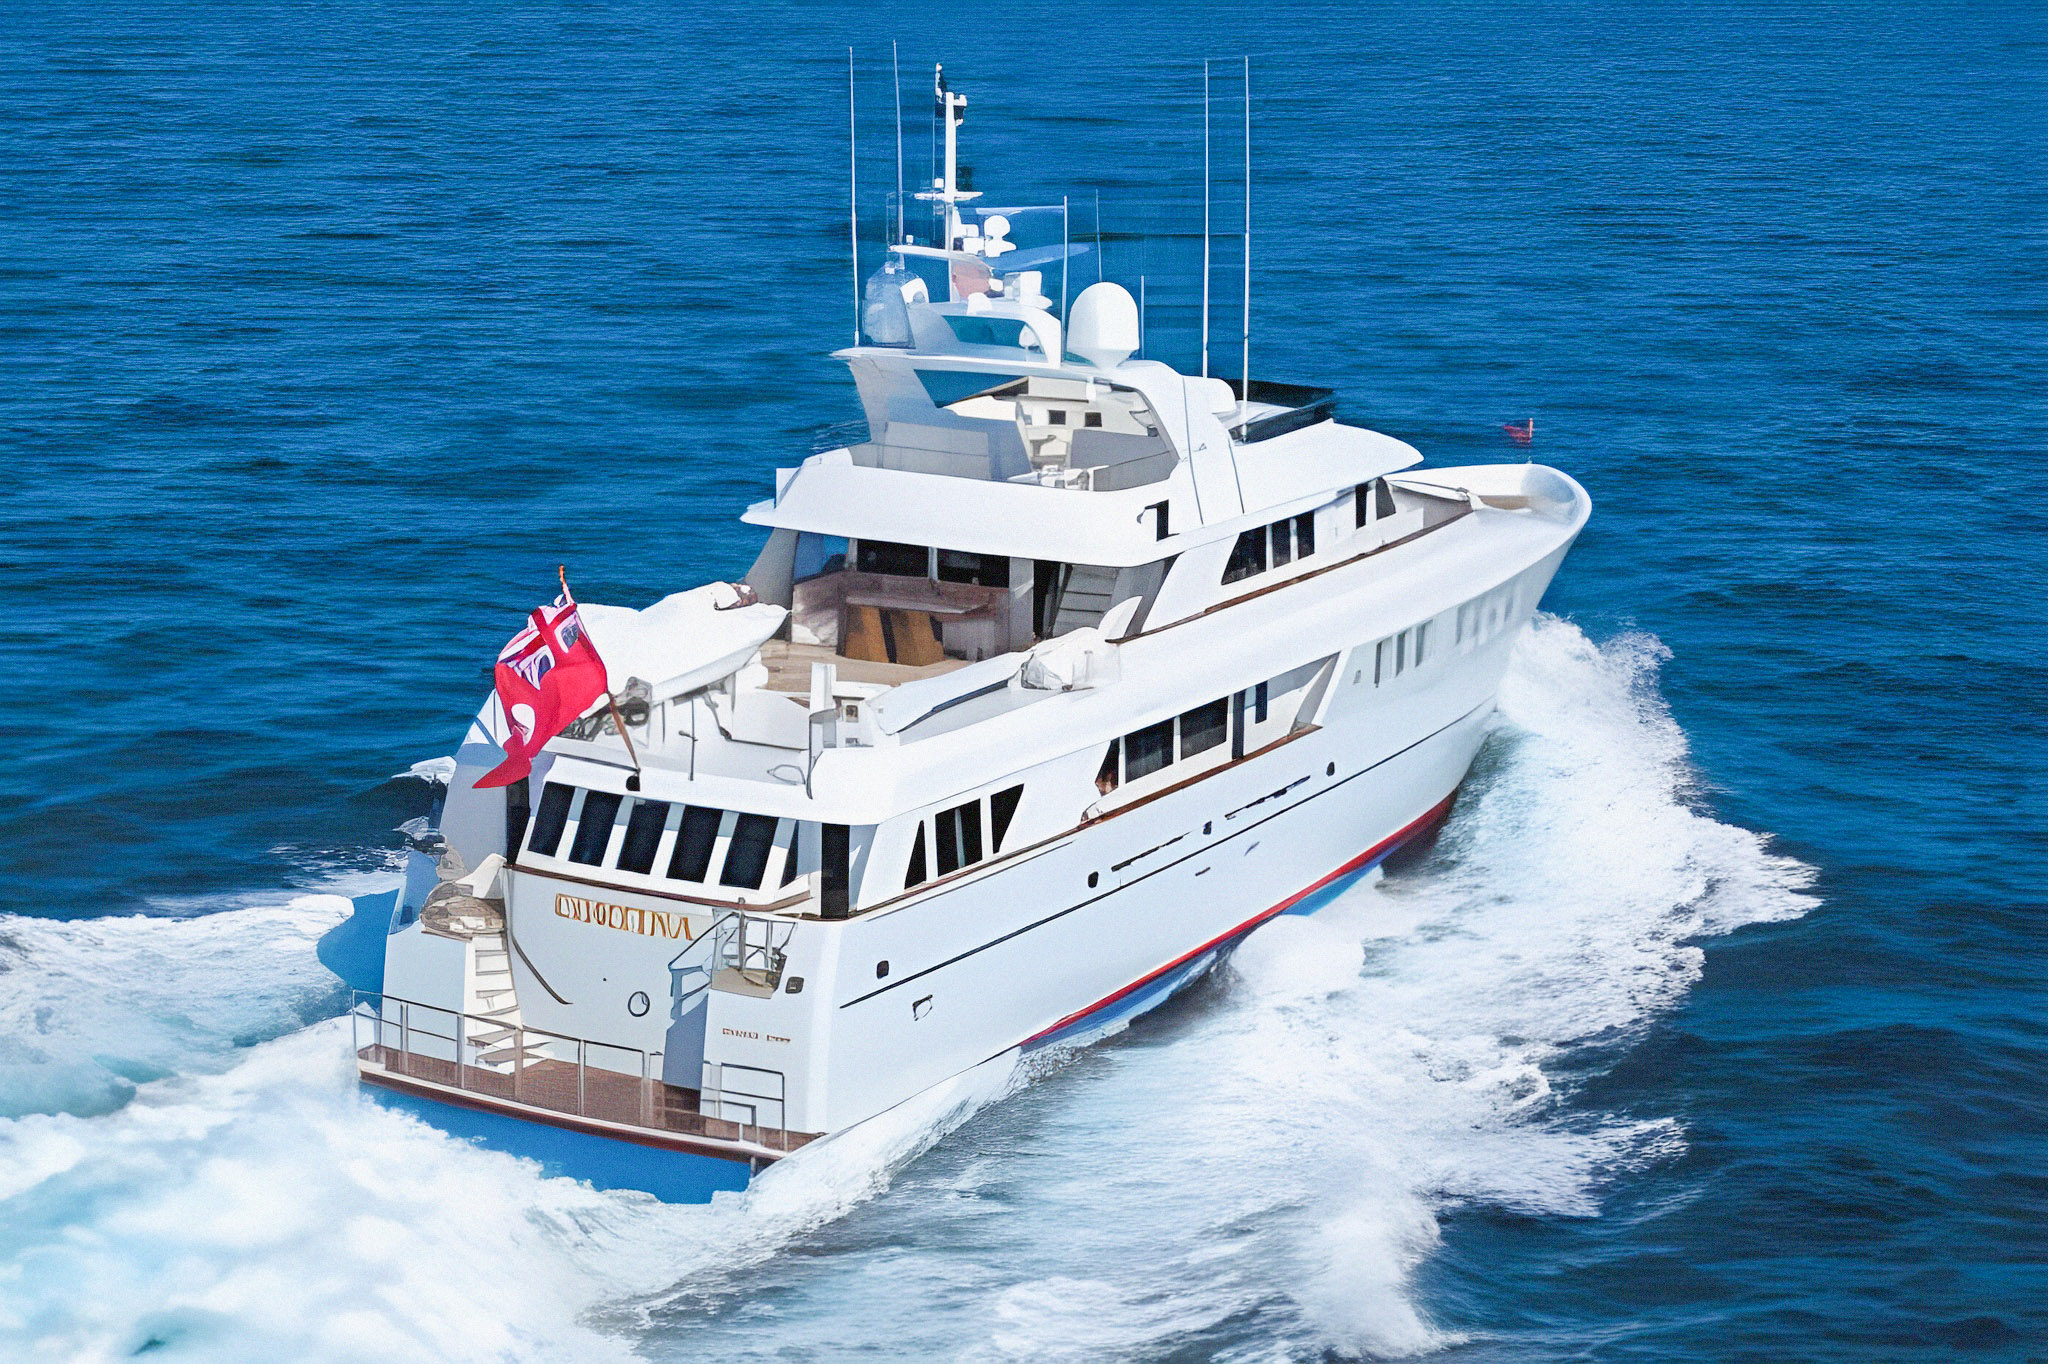
Cortina makes an impression underway: a white hull, three decks and a broad wake behind her. Below deck, another part of the yacht’s story is easier to overlook. Our original photographs document an Arid Series 9 installation arranged alongside discharge and monitoring equipment in the machinery space.

Cortina motor yacht underway, viewed from above and astern.
Cortina underway, from the original Arid boat feature.

The yacht behind the installation

Built by Newcastle in 2010, Cortina is a 114-foot custom motor yacht. In its 2013 listing announcement, Worth Avenue Yachts described her tri-deck layout, four guest cabins and custom Hodgdon Yachts interior. Those details give a sense of the spaces and craftsmanship aboard this particular vessel.

The Arid photographs take us into a different part of that setting. They pair the yacht’s exterior with a close view of the installed equipment, offering a look at the machinery behind everyday bilge care.

A closer look at Cortina’s Arid installation

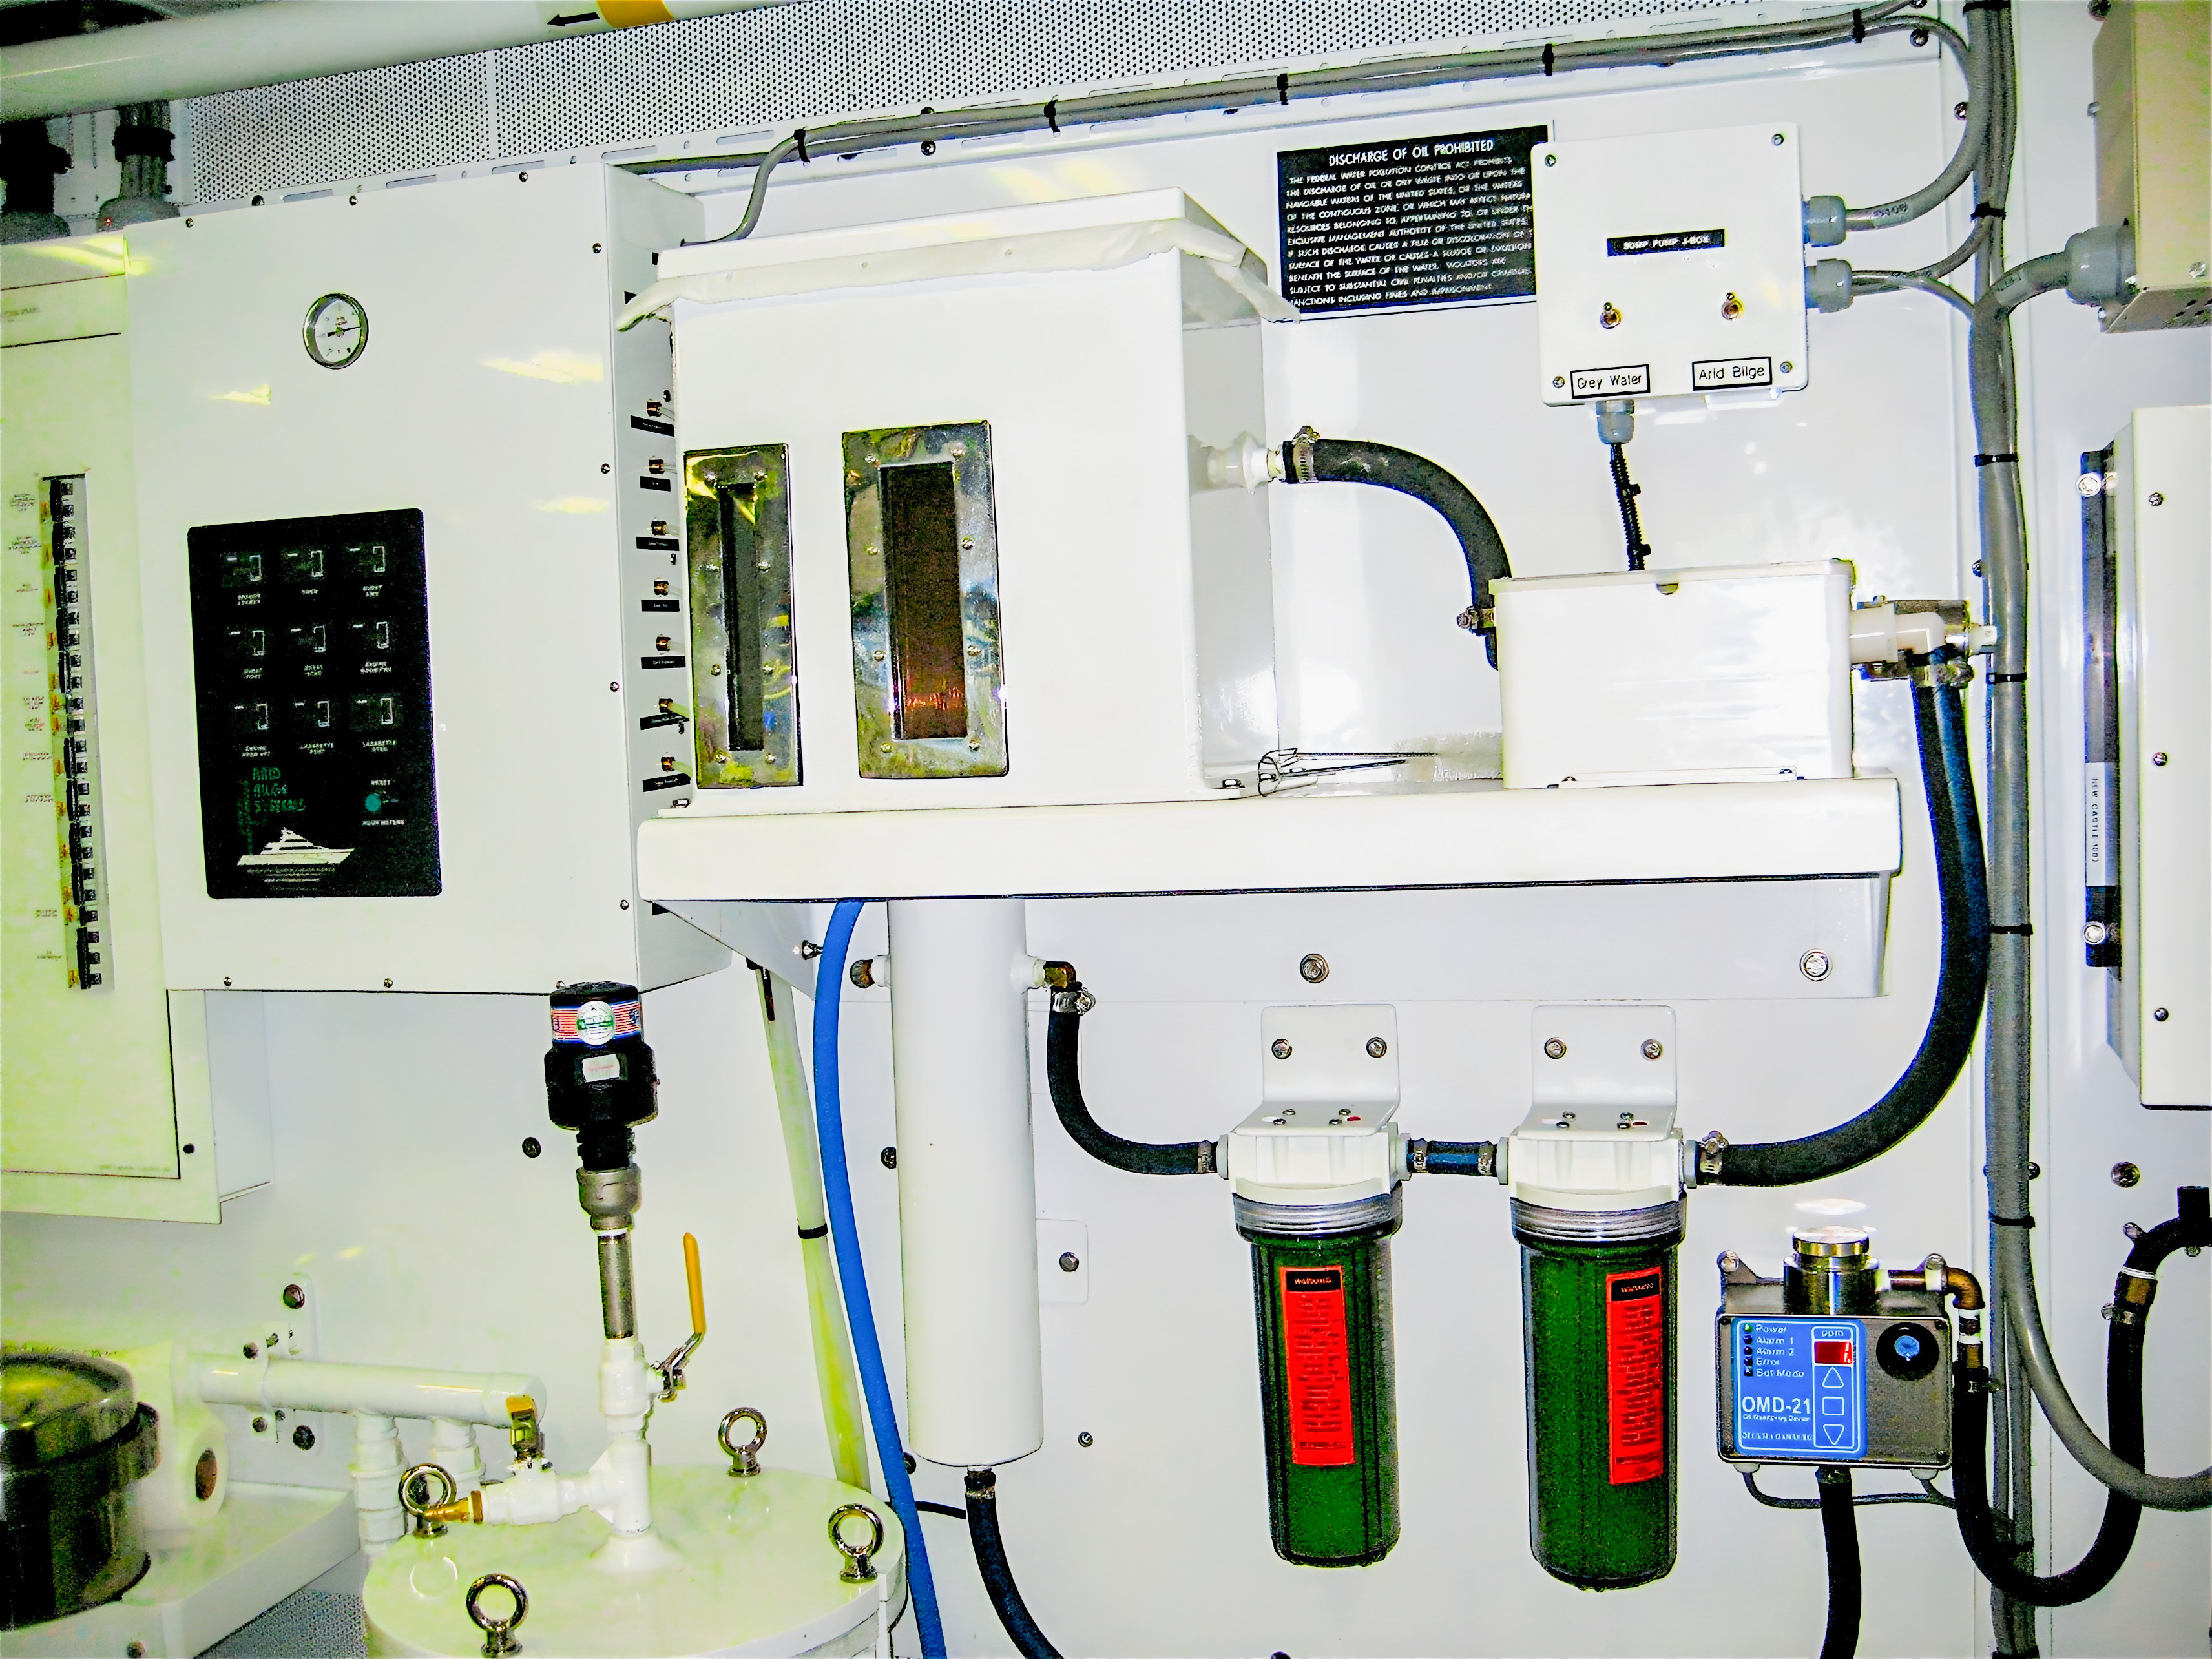
The Series 9 cabinet appears on the left of the installation photograph. Companion equipment occupies the same bulkhead, with controls, hoses and fittings facing into the machinery space. The photograph is useful because it shows the equipment in context: its mounting position, the surrounding pipework and the room available around it.

Arid bilge-drying equipment and connected discharge equipment installed aboard Cortina.
The Arid cabinet and connected discharge equipment aboard Cortina. Open the photograph for a closer view.

Our original Cortina feature also identifies a PP-Monitor for fuel and oil leak detection. Residual-water collection and contamination monitoring serve different purposes. Drawing fluid out of a low point does not itself separate oil, establish that discharge is suitable, or repair the source of a leak.

Why residual water deserves its own system

A conventional bilge pump can finish a cycle while leaving a shallow layer of water below its effective pickup level. In separate compartments, that water may gather in more than one low point. Reaching each area with a sponge or wet vacuum becomes a recurring maintenance job.

Arid addresses that remaining water through pickups connected to a central unit. Vacuum draws fluid into a collection chamber; air pressure then moves the collected fluid along the discharge line. The yacht’s conventional bilge pumps remain responsible for higher-volume pumping. See the pickup-to-discharge process for a closer explanation.

Cortina illustrates why the equipment arrangement matters as much as the yacht’s length. A useful installation plan starts with the separate wet areas, then follows the tubing route back to the unit and through the discharge arrangement. Controls and service points need to remain accessible. The photographed layout is one vessel’s solution, rather than a size-based prescription for every 114-foot yacht.

Explore the systems and the next boat story

Planning an installation aboard your own yacht? Browse the current Arid product range or talk with our team about the layout. Current specifications should be checked for your vessel; the equipment in an earlier installation may differ from today’s options.

View the original Cortina feature and photographs.

10 10, 2026
  • DRYVER beside an Arid Bilge Systems unit in the original automatic bilge-drying video thumbnail.

Follow the Water: From Bilge Pickup to Discharge

By |2026-10-10T19:28:32+00:00October 10, 2026|Articles, Blog|

Lift a hatch after a bilge pump finishes and you may still find water sitting in a low corner. That small pool is where this story begins.

Our DRYVER animation follows residual water from the pickup to the central Arid system. Paired with the How Arid Works illustration, it answers a practical question: what happens between the wet spot and the discharge line?

Start where the water collects

A boat can have several separate low points. Water near the bow may collect somewhere different from water in the stern or machinery space. A pickup has to serve the area where that residual fluid gathers.

That is why the first step is understanding the boat’s wet areas. The aim is to collect the water left behind after ordinary bilge pumping, including water in places that are awkward to reach with a sponge or wet vacuum.

Conceptual illustration of Arid Bilge Systems collecting residual water from boat low points and moving it through a central collection chamber.
Conceptual view of the pickup, collection and discharge route. Follow the instructions for the system installed on your boat.

Vacuum brings the fluid in

Arid creates a vacuum inside its collection chamber. That vacuum draws residual fluid through the installed pickups and tubing to the central unit. The animation makes the route easy to follow: a low point, a pickup and a path back to the system.

The compressor handles air, while the collection chamber receives the bilge fluid. Fluid does not pass through the air compressor. This separation is part of the operating approach shown in our illustration.

Air pressure moves the collected fluid out

After collection, the system uses air pressure to move the fluid through the discharge line. Vacuum brings fluid into the chamber; pressure moves it onward. Automatic control manages that process.

There is an important distinction at the outlet: moving bilge fluid does not clean it. Fluid can contain oil, salt, dirt or other residues. Contaminated fluid still needs appropriate collection or treatment; the drying process should never be mistaken for oil separation.

A clearer picture of everyday bilge care

Removing standing water addresses one source of persistent moisture below deck. It can also leave a low point easier to inspect when water appears again. Finding that water still calls for attention to its source, along with normal cleaning, pickup checks and maintenance.

Arid handles everyday residual-fluid removal. Keep the boat’s standard bilge pumps for emergency water removal. Follow the operating and maintenance instructions for the installed system.

The illustration and animation are conceptual views of the fluid route. They are not an installation drawing for every vessel.

Watch DRYVER follow the water through the system, then take a look at how Arid works. If water keeps collecting on your boat, find an Arid dealer and start with the location of those wet areas.

For the vertical cut, watch DRYVER’s residual-water animation on YouTube Shorts.

9 09, 2026
  • Left-aligned bold headline 'Separate. Inspect. Service.' with teal underline; right-side diagram shows oil/fuel at top, emulsified layer, and water below labeled for a passive separation stage.

Eco-Drain: Separating Oil from Bilge Water

By |2026-10-11T02:39:08+00:00September 9, 2026|Articles, Blog|

Eco-Drain is an optional oily bilge water separator used after the Arid Bilge System collects residual fluid. It adds a separation stage to the collection and discharge arrangement; it does not replace the Arid unit.

The distinction matters because bilge fluid may contain oil, diesel residue or other contamination. Moving that fluid out of a low point does not make it clean or establish that it is suitable for discharge.

What Eco-Drain does

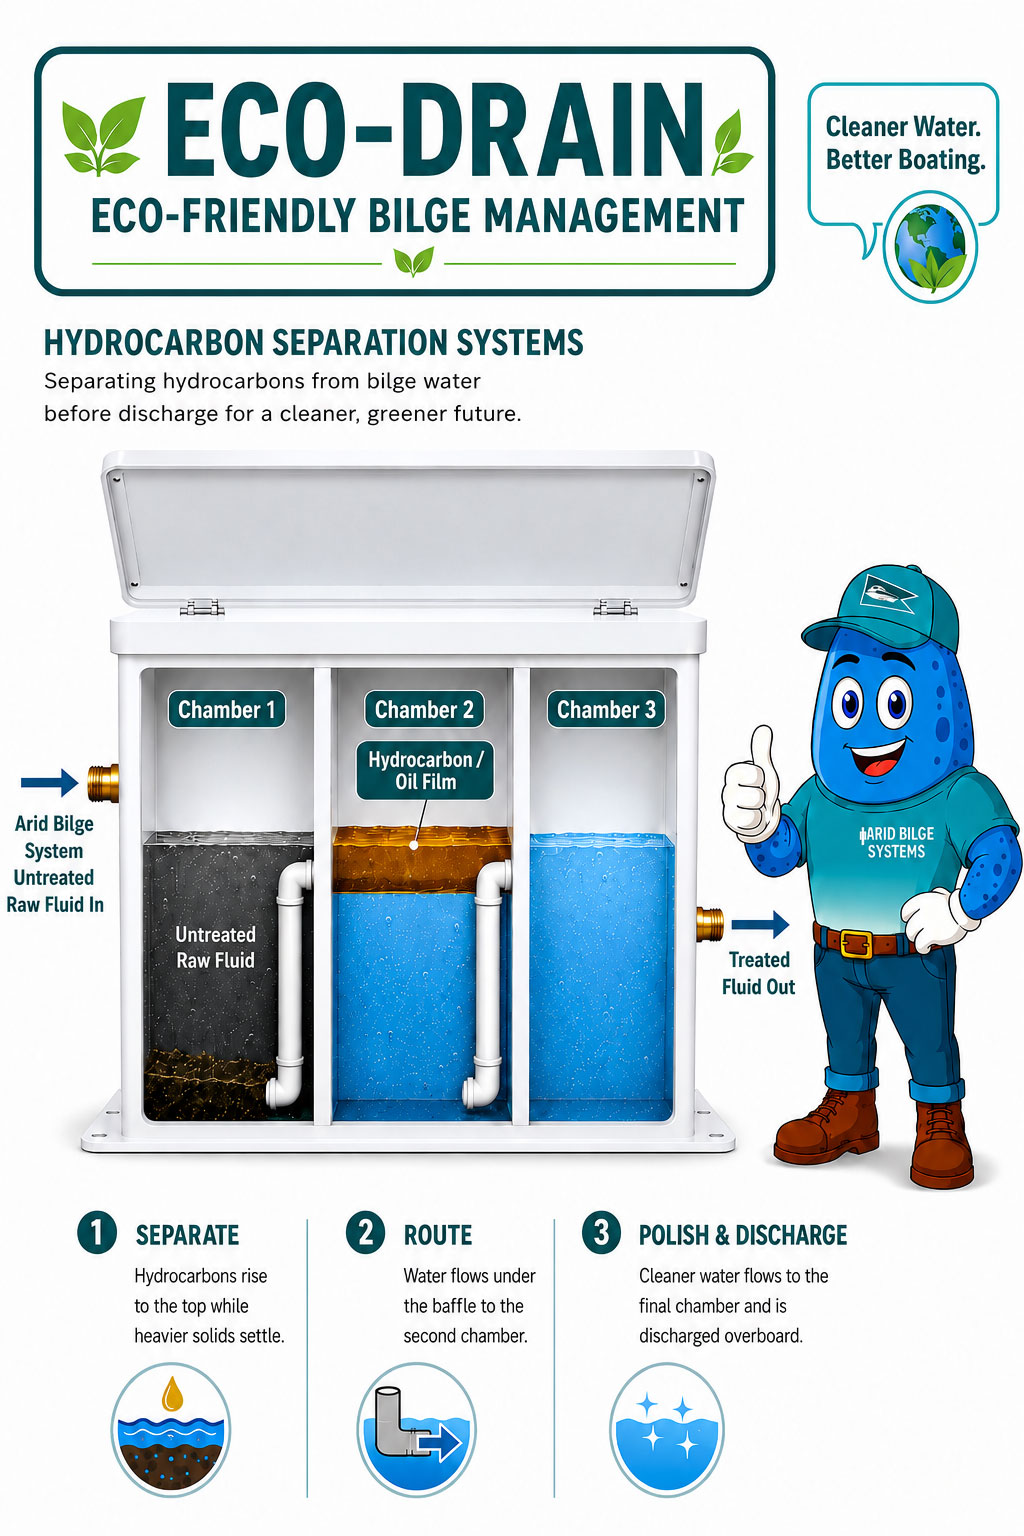
Eco-Drain provides a chamber in which lighter hydrocarbons can separate from water by gravity. Separated hydrocarbons remain in the unit for removal during service, while water follows the installed outlet arrangement.

This is physical separation, not a promise to remove every contaminant. Do not assume that a gravity separator removes dissolved chemicals or every mixture that might enter a bilge. Match the equipment and fluid-handling arrangement to the vessel’s actual conditions.

Eco-Drain illustration showing the separation and discharge route.
Conceptual flow illustration. Confirm the arrangement for the selected model and installation.
View full-size diagram

How it fits with Arid

The Arid system collects residual fluid from its connected pickup locations and transfers it through the discharge arrangement. Where Eco-Drain is installed, that route leads through the separator before the water continues to an appropriate collection or discharge point.

The two products perform different jobs: Arid collects and moves residual fluid; Eco-Drain adds a separation stage. Neither replaces investigation and repair of the leak or spill that introduced contamination.

Check the current model options

The current public shop lists these Eco-Drain products:

Confirm current compatibility, mounting dimensions, discharge arrangement and service access with Arid or your installer before ordering. Product names and the selected configuration should match the installation documents.

Allow for gravity drainage and service access

Eco-Drain relies on gravity for its outlet flow. Available height and the final fluid route therefore matter when choosing a mounting position. The installation needs suitable support for the unit and its fluid, plus access for inspection and service.

Ask the installer to show the complete route, including any collection point or additional equipment. A location that fits the empty unit may still be unsuitable if it prevents drainage, access to the lid or removal of retained hydrocarbons.

Inspect and remove retained hydrocarbons

Inspect the chamber according to the installed model’s instructions. Remove accumulated hydrocarbons using its specified service method before the permitted accumulation level is reached.

Place collected material in suitable containers and use the appropriate waste facility or collection service. Do not return it to the bilge or pour it into marina water or drains.

Keep viewing surfaces clear enough to inspect the fluid levels. Use the model’s cleaning instructions and compatible products; record service and unusual changes in accumulation.

Where Eco-Alarm fits

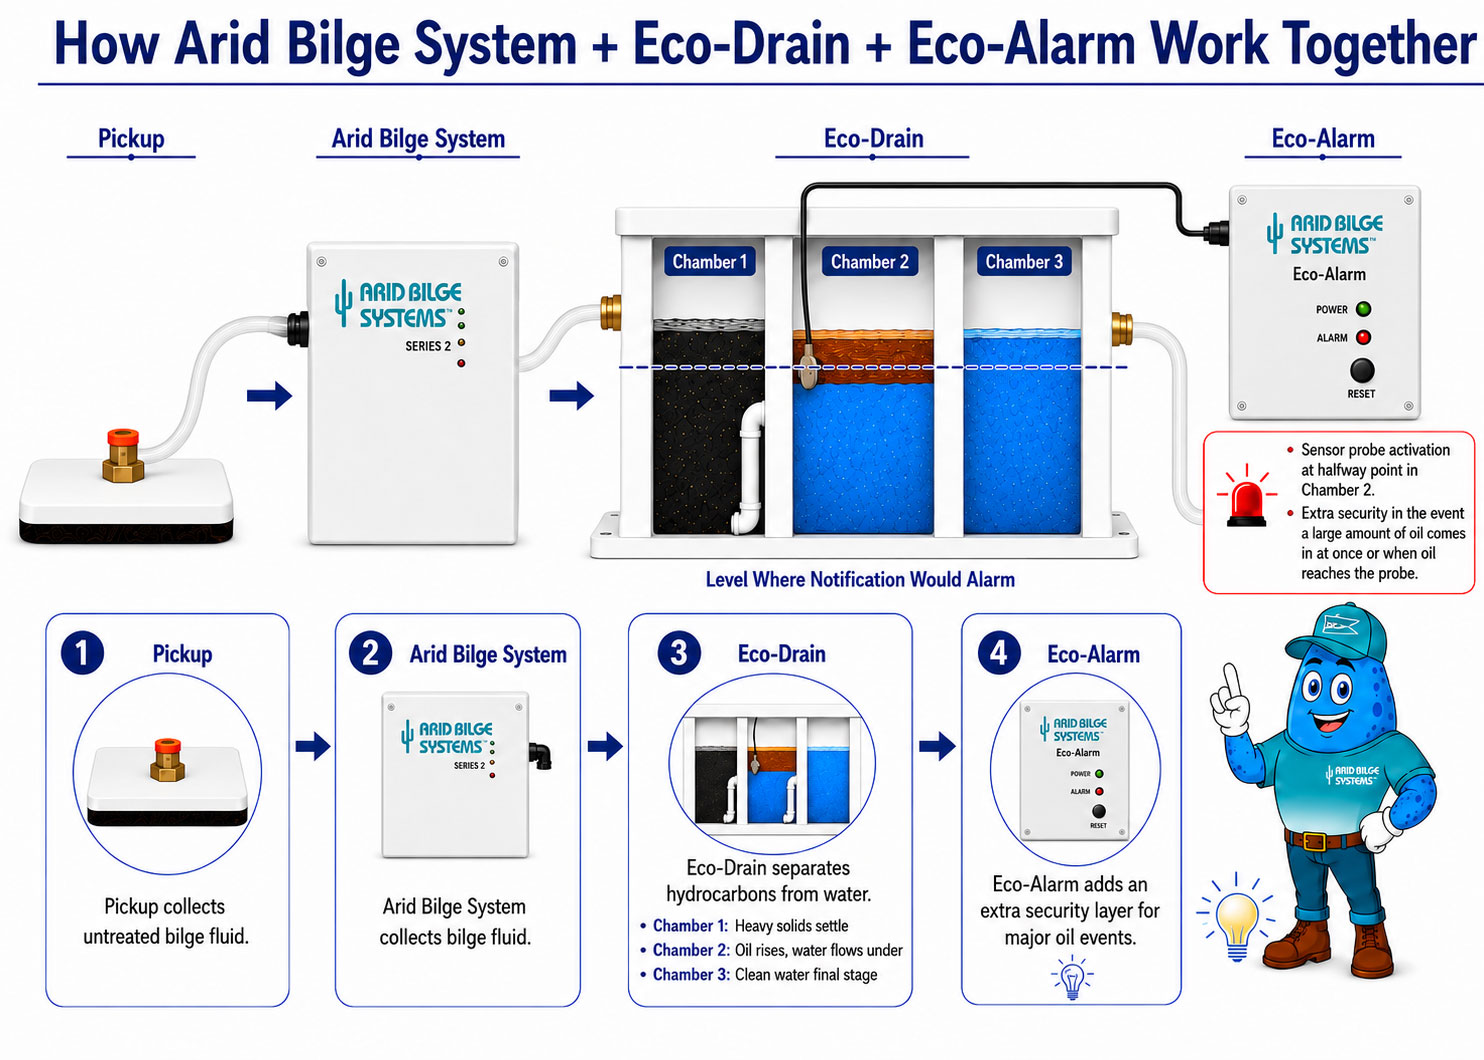
Eco-Alarm is a companion alert product for hydrocarbon accumulation. An alert calls for inspection; it does not identify or repair the source automatically. Confirm its compatibility and operating instructions for the selected installation.

Eco-Alarm illustration showing monitoring associated with the Eco-Drain chamber.
Eco-Alarm adds an alert function. Inspect and service the installation according to its instructions.
View full-size diagram

Plan the whole fluid route

Start with the contaminants that may reach the bilge, the selected Arid model, the available mounting space and the intended collection or discharge point. Discuss those details with an Arid dealer or installer.

For the collection stage, follow the water from pickup to discharge. Keep the current model instructions with the boat and use them to establish its inspection and service routine.

9 09, 2026
  • Front panel of an Arid Bilge Systems Series 4 cabinet showing its eight zone-runtime meters.

Zone Runtime: Read the Meters, Then Inspect the Boat

By |2026-10-11T20:54:27+00:00September 9, 2026|Articles, Blog|

Zone runtime can help you decide where to start an inspection. On an Arid system equipped with zone hour meters, each reading relates to a connected pickup location. Matching the readings to a clear zone map makes the information useful.

A high reading does not identify a leak or measure how much water has been removed. Compare dated readings, inspect the corresponding pickup area and investigate what changed.

Connect each reading to a pickup

Give each zone a useful location name, such as aft bilge or forward compartment. Match that name on the unit, at the pickup where practical, and in the boat’s service notes.

The map should let someone find the area without tracing every tube. Include a photograph if the pickup is difficult to see through the access opening.

Compare the same period

Record the meter readings and date. Repeat the readings after a known interval, then compare the increase for each zone. Totals taken over different periods do not provide the same comparison.

For example, suppose three zones add 100, 100 and 500 hours over the same recorded period. The third zone merits a closer look. That difference alone does not establish the cause or prove the other two zones are operating correctly.

Also compare each zone with its own earlier pattern. A location that normally receives more water can run longer than another location without a new fault. A change in its usual behavior may be more useful than the largest number on the panel.

Series 4 front panel with eight labeled zone hour meters and a meter reset control.
In this photographed Series 4 configuration, record dated readings from the eight zone hour meters and match each meter to its pickup location.

Inspect the area and the installation

Note recent rain, washdowns, trips and air-conditioning use. Then check the accessible wet area and the equipment serving it.

  • Look for recurring water, drips or changes in nearby hoses, fittings and drains.
  • Check the pickup for debris and confirm that it remains in the intended low point.
  • Have restricted tubing or other installation problems assessed according to the model’s instructions.
  • Record alarms, unusual operation and any work performed.

The pickup marks where fluid collects. Water may travel from somewhere else before reaching it. Follow the evidence back toward the source rather than assuming the pickup is beside the leak.

Keep a useful service record

A short record is enough: date, zone name, meter reading, conditions and observations. Dated photographs of the same location can show whether water or residue has returned after cleaning or repairs.

Bring that record and the zone map to your technician. They provide a clearer starting point than a report that the system is “running more.”

Read the wet-zone guide when preparing the map, and keep the instructions for your model aboard.

What the meters cannot tell you

Runtime is an inspection clue. It does not diagnose the source, composition or volume of the collected fluid. Residual-water removal also does not repair a leak or replace the boat’s conventional bilge pumps and alarms.

If water enters unexpectedly or the boat’s normal operation changes, investigate promptly. Use the readings to organize that work, then confirm the cause through inspection.

Common questions

Do all Arid systems have zone hour meters?

No. This guidance applies to units equipped with them. Check the controls and instructions for your installed model.

Does the longest-running zone always have a leak?

No. Normal differences between compartments, returning water, pickup condition and installation issues can affect operation. Inspect before deciding what needs repair.

Should I compare meter totals or changes?

Record both totals and dates so you can compare changes over the same period. Keep the conditions and service history alongside those readings.

3 09, 2026
  • Arid Series 4 unit and tubing installed beside separate Reverso fuel-polishing equipment

Dry Bilge System Cost: Compare the Complete Installation

By |2026-10-10T22:26:52+00:00September 3, 2026|Articles, Blog|

Dry bilge system cost depends on the work needed to serve your boat’s wet areas. Equipment price is one part of that estimate. Access, mounting, tubing, electrical connections, discharge routing and installation labor also matter.

Start by defining the job. Replacing a failed conventional bilge pump is a different project from removing shallow water left in separate compartments. Arid automatically collects residual fluid from installed pickups; it complements the boat’s conventional pumps and alarms.

Replacing a pump versus adding a new installation

A replacement pump may use an existing mounting position, wiring and discharge route, provided those remain suitable and serviceable. Adding equipment to another compartment can require new access, plumbing and electrical work.

Ask the installer to identify which parts can be reused and which need attention. An estimate based only on the new pump’s retail price leaves those questions unanswered.

What belongs in a dry bilge system estimate?

Compare options that address the same residual-water locations. Request an itemized estimate covering:

  • Wet areas: the separate low points to be served and the planned pickup positions.
  • Equipment: the selected model, pickups, tubing, fittings and controls.
  • Access and mounting: any panels, brackets or other work needed to install and service the equipment.
  • Electrical work: the correct supply, circuit protection and accessible means of switching the system off.
  • Fluid routing: the collection or discharge arrangement and any additional treatment equipment.
  • Labor and commissioning: installation, testing each pickup location, labeling and owner handover.
  • Additional vessel work: any haul-out or through-hull work the proposed installation actually requires.

Whether a suitable existing discharge route can be used depends on the vessel. Have the installer confirm that route before assuming that new hull fittings—or a haul-out—can be avoided.

Arid unit and connected tubing in an installed equipment space
Access around the unit and its tubing belongs in the installation plan.

Count locations before choosing equipment

Depending on the model, an Arid unit serves one or several pickup locations. Separate pockets of water may need separate pickups even when they are close together. Boat length alone does not establish that count.

A multi-zone installation brings several intake routes back to a central unit. That can change the amount and location of plumbing and equipment compared with separate residual-water removal devices. The useful comparison is the complete proposed installation on your boat.

Read how the Arid system works, then use the wet-zone guide to prepare a list. Photographs of each low point and its access opening make an installer’s assessment more useful.

Include the maintenance you will actually do

Keep enough access to inspect pickups, tubing and the central unit after installation. Ask who will clean the pickup areas, investigate changes in operation and perform any model-specific seasonal service.

A normally dry compartment can make new water easier to notice. Removing residual water does not repair a leak, remove existing contamination or guarantee a particular reduction in repair costs. Treat those conditions as maintenance questions to investigate, rather than assumed financial savings.

Bring the same brief to each installer

Provide the wet-zone list, boat layout, supply voltage, mounting-space measurements and photographs. Ask each installer to state the equipment and work included, the exclusions and how the finished system will be tested.

Our installation preparation guide explains what to gather. An Arid dealer can then discuss a configuration for those locations.

Common cost questions

Can Arid replace a failed conventional bilge pump?

No. Restore the boat’s required pumping and alarm equipment. Consider residual-water removal as a separate job, and investigate the source of unexpected incoming water.

Does every installation need a new through-hull?

That depends on the boat and the proposed routing. Have the installer assess the existing arrangements and identify any changes in the estimate.

Is there one reliable installed price for every boat?

No. Wet-zone count, access, selected equipment and the required vessel work vary. An itemized quote for the actual boat is more useful than an unsupported average.

23 08, 2026
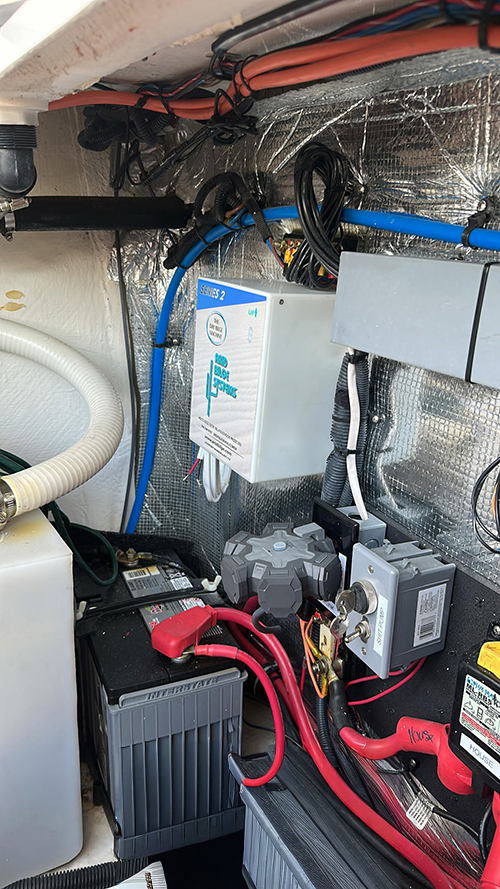
  • Arid Bilge Systems Series 2 equipment installed inside a boat compartment.

What a Dry Bilge System Can Save Boat Builders

By |2026-10-15T01:45:17+00:00August 23, 2026|Articles, Blog, Boat Builders|

Keeping owners satisfied after the boat leaves the factory

Why do builders choose Arid? Because the water left below a conventional bilge pump's pickup deserves a plan of its own. A drier low point can make inspection easier and removes one source of persistent moisture. For builders, dealers and owners, the longer-term value depends on the boat, the installation and the service work actually avoided.

Dealers and service departments often see the long-term consequences of below-deck moisture before anyone else.

They sell the boat, maintain it, communicate with the owner, and see what returns months or years later: odor complaints, corrosion, damp compartments, electrical concerns, generator problems, gyro issues, thruster service, and components that appear to have aged prematurely.

That does not mean builders have overlooked the problem. Boat builders already face the difficult responsibility of engineering complex vessels, improving layouts, controlling production costs, meeting safety requirements, and delivering greater value to the customer.

The challenge is that residual moisture often creates problems gradually—and the eventual failure may not be traced back to the environment that contributed to it.

How Below-Deck Moisture Can Become a Warranty Concern

Moisture-related problems may return to a builder through:

  • Warranty claims
  • Dealer service reports
  • Component replacement costs
  • Corrosion and electrical diagnostics
  • Customer complaints
  • Odor and mildew concerns
  • Reduced long-term owner satisfaction

A generator, gyro, thruster, pump, bracket, fastener, or wiring connection may require service during the warranty period. In many cases, the visible component failure receives attention while the damp environment surrounding that component goes unaddressed.

Repairing the component addresses the immediate failure. Investigating recurring water addresses an environmental condition that may otherwise remain after the repair.

Two Ways Moisture Reaches Marine Equipment

Moisture generally affects below-deck equipment through two primary pathways.

Direct exposure

Equipment mounted low in a vessel may be exposed to standing water, splash, or fluid moving between compartments.

Depending on the vessel layout, this may affect:

  • Pumps and float switches
  • Wiring connections
  • Fasteners and brackets
  • Thruster equipment
  • Generators
  • Sensors and control components

We have observed situations where water moved aft through the vessel and reached equipment mounted in machinery spaces.

Environmental exposure

Equipment does not have to sit in water to be exposed to moisture. Residual water can evaporate as an enclosed compartment warms, then condense on cooler surfaces.

With limited ventilation, that cycle can keep wiring, fasteners and surrounding machinery damp. Over time, it can contribute to odor, mildew, corrosion and staining. Our guide to bilge odor, humidity and corrosion explains the moisture pathways and inspection checks behind those concerns.

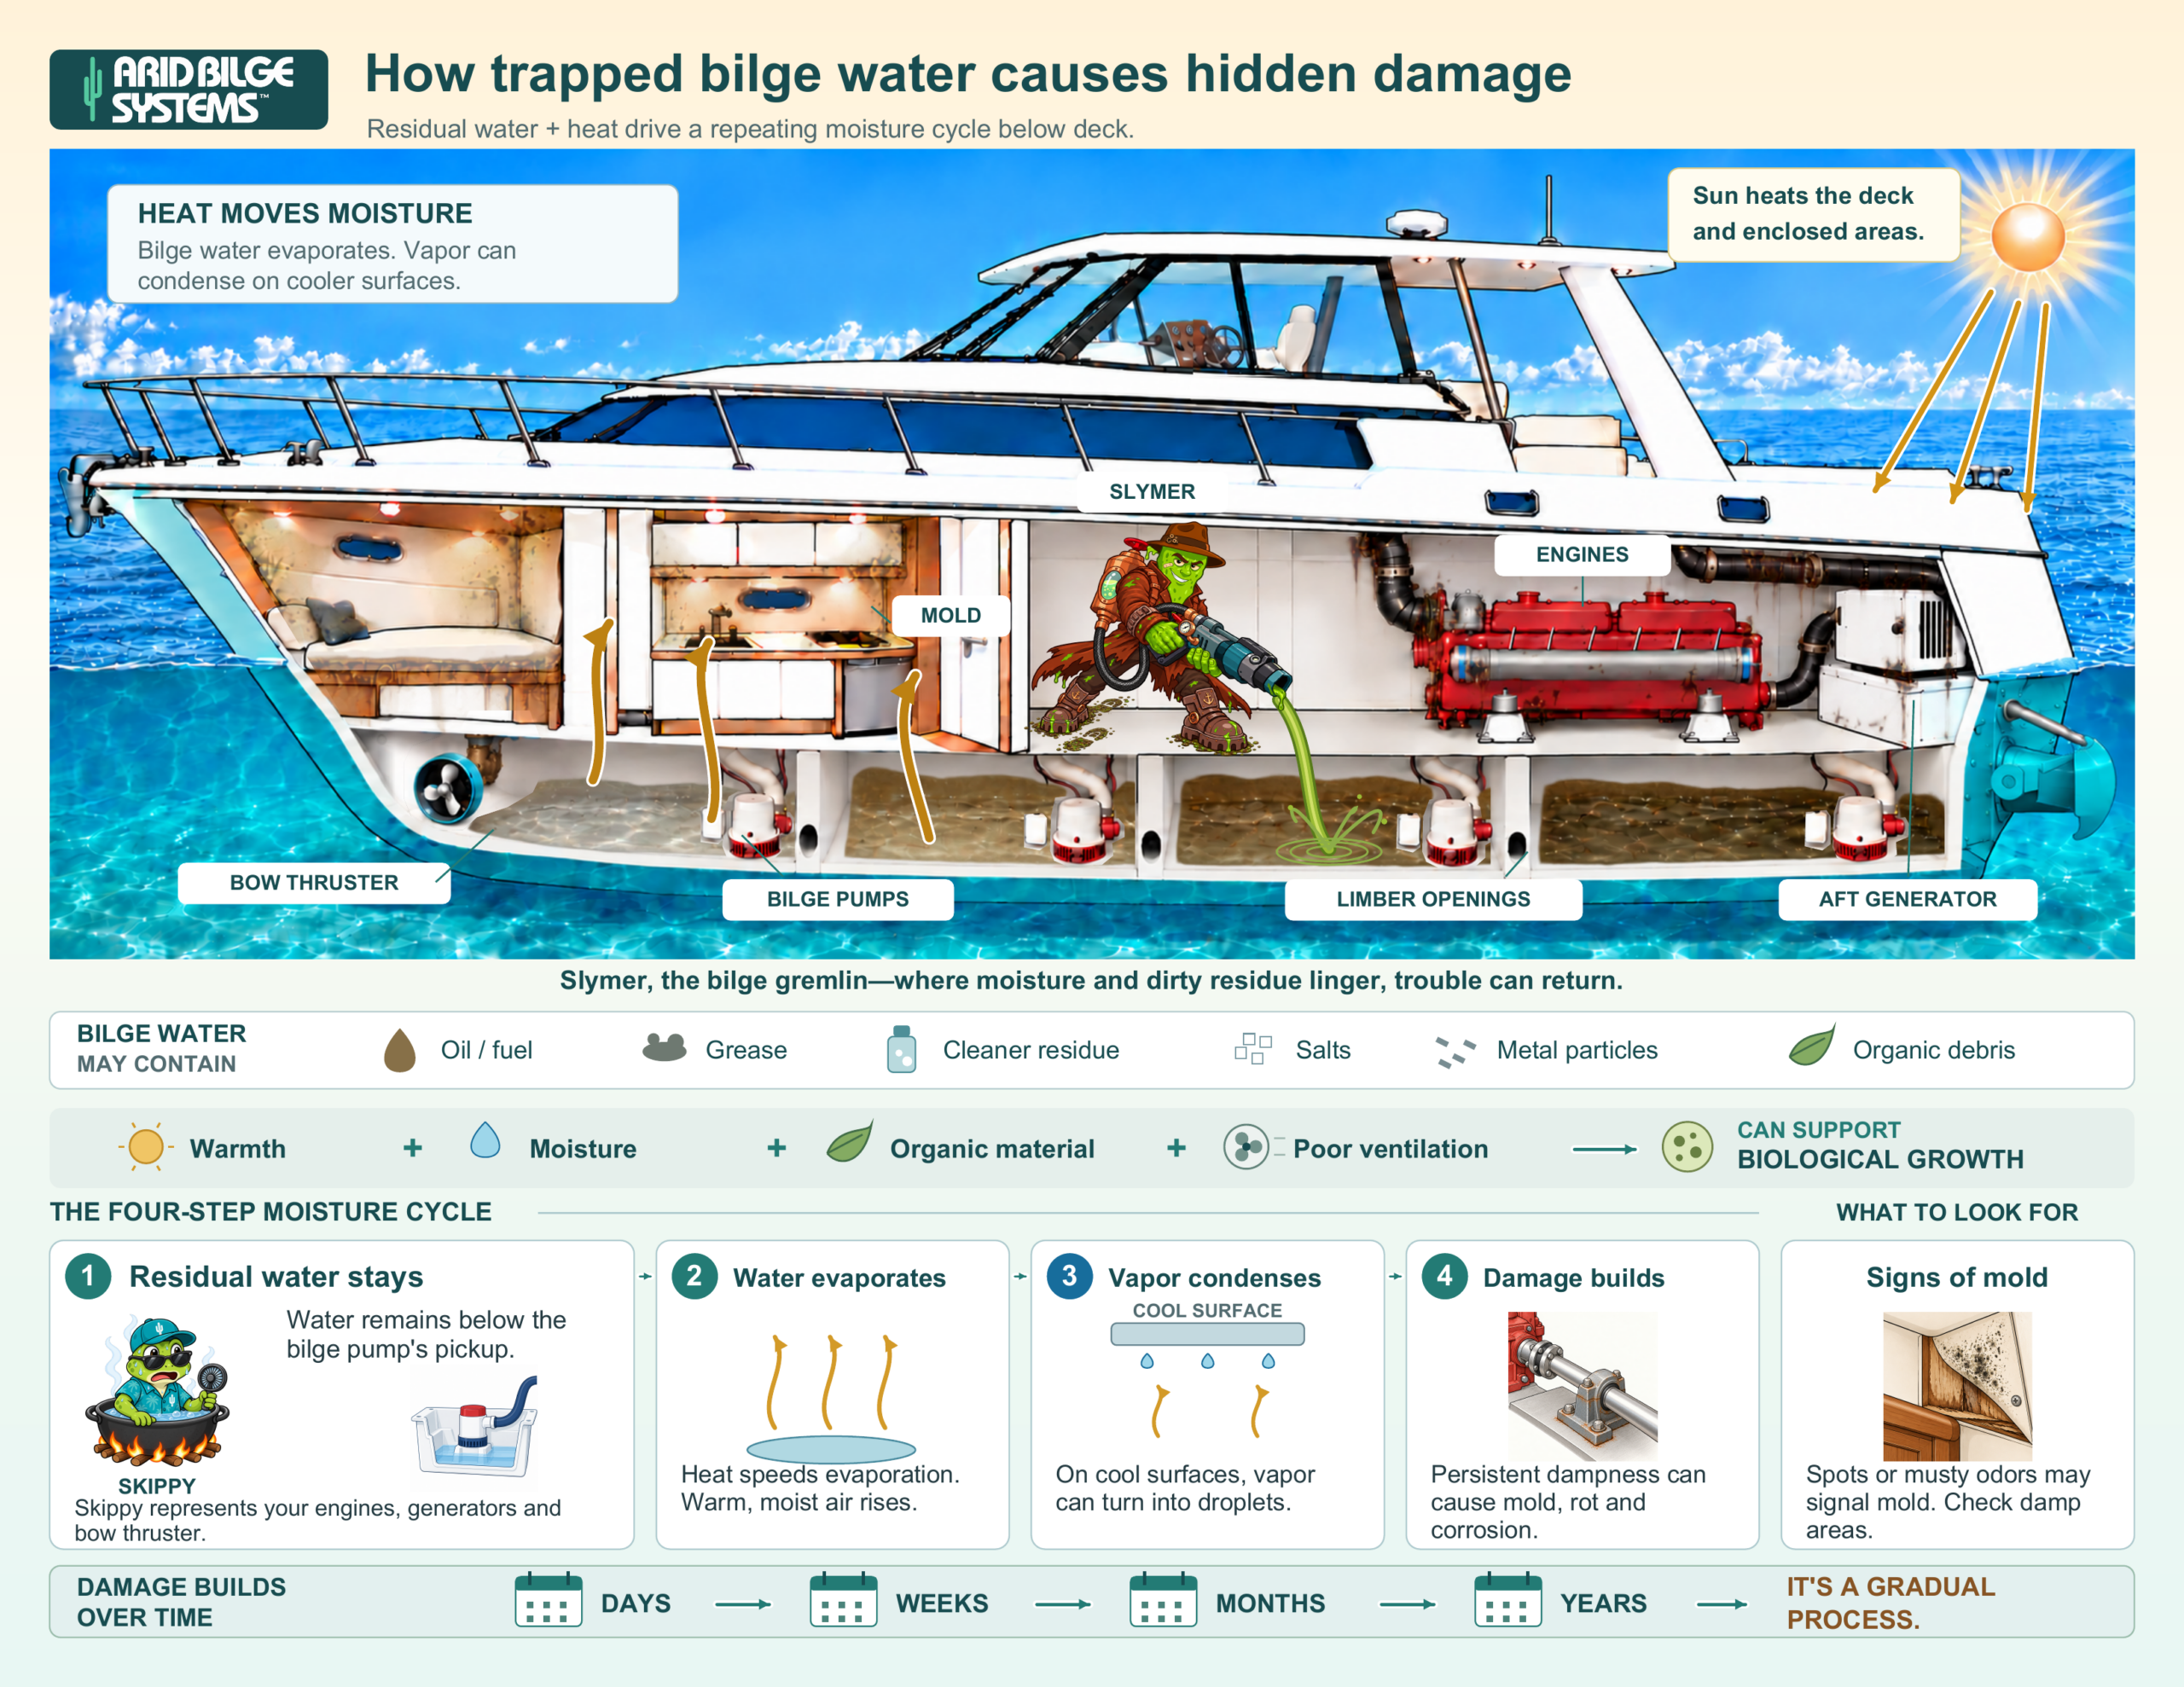
What happens out of sight, below deck?

A small pool can keep supplying water vapor as a compartment warms. When a surface is below the dew point, moisture can condense there. Standing water can also reach low-mounted equipment directly. Persistent dampness, organic residues and limited ventilation can contribute to mildew, odors and corrosion.

Slymer illustrates trapped bilge water, evaporation, condensation and potential damage around the cabin and machinery.
The moisture cycle, illustrated with Slymer. This cutaway explains possible exposure pathways; it is not a measured damage timeline or a diagnosis of a particular boat. Salt and sludge do not evaporate with water, and condensation depends on temperature and humidity. View full-size image

The service question is both what failed? and why was this area wet? A repair may restore a connection or component while a leaking fitting, blocked drainage route or wet low point remains. Diagnosing the actual cause matters: not every electrical, generator or thruster problem is caused by bilge water.

What Same-Model Comparisons Can Reveal

Inspecting similar vessels over time can help a builder identify recurring wet areas and service concerns. Record standing water, staining, odors and the condition of surrounding equipment, alongside installation and maintenance differences.

Those observations can guide investigation. They do not, by themselves, isolate the effect of Arid or establish a measured reduction in repairs.

These observations do not mean every component problem is caused by bilge water. Equipment life is influenced by installation quality, climate, operating conditions, ventilation, maintenance, salt exposure, and many other variables.

However, the underlying physics remains straightforward:

When residual water remains below deck, evaporation, humidity, and condensation can continue. When that water is consistently removed, one major source of below-deck moisture is reduced.

Why the Factory Is the Best Time to Plan for It

Installing a dry bilge system during construction offers several advantages.

At the factory:

  • Compartments are open and accessible
  • Pickup locations can be planned around the actual vessel geometry
  • Tubing routes can be installed cleanly
  • The system can be integrated into the electrical design
  • Mounting locations can be selected before access becomes restricted
  • Discharge routing can be engineered into the vessel
  • The installation can be tested before delivery

A properly planned discharge arrangement may also provide a cleaner and more direct installation than a later retrofit.

The exact discharge method should always be designed for the specific vessel and completed in accordance with applicable marine standards, engineering requirements, and manufacturer instructions.

Factory installation also gives the builder an opportunity to place pickups at the actual low points of the vessel rather than working around finished interiors and restricted service access later.

A Centralized Approach to Residual-Water Management

Traditional emergency bilge pumps remain essential safety equipment. They are designed to move larger volumes of water during leaks, equipment failures, or other emergencies.

An Arid Bilge System performs a different job.

It automatically removes the smaller amounts of residual water that conventional pumps leave behind. Multiple pickup zones can be managed from one centralized system, helping keep the bow, machinery spaces, midship compartments, and stern drier between emergency-pump activations.

This can provide:

  • Centralized residual-water removal
  • Cleaner machinery spaces
  • Easier identification of new leaks
  • Reduced standing water
  • Less standing water available to evaporate
  • Fewer odor-producing wet areas
  • Better visibility during inspections and service

The purpose is not to replace required emergency pumping equipment. It is to manage the moisture that remains after those systems have done their job.

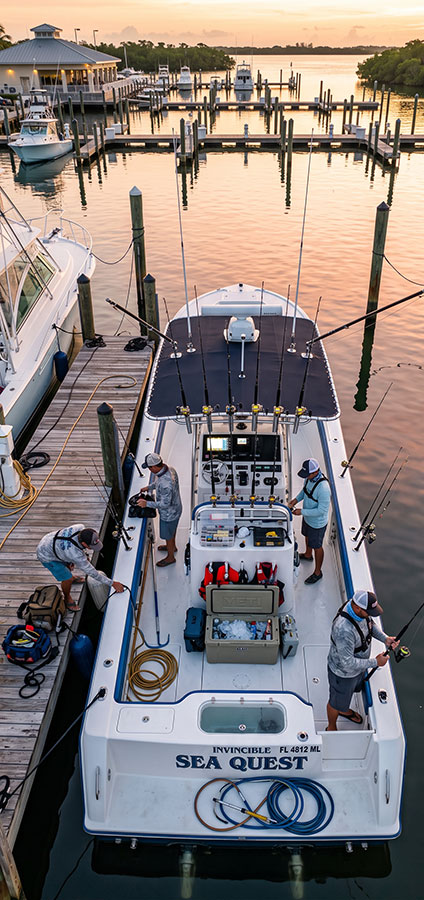
Top-down view of the white fishing boat Sea Quest docked at a marina at sunset, with anglers fishing from the stern.

Remove the residual water. Reduce one moisture source.

Low-profile pickups connect selected low points to the Arid unit through small tubing. Arid collects the remaining liquid and transfers it to the vessel's designed discharge arrangement. Removing that water leaves less available to evaporate and makes newly returning water easier to see during inspection.

Dryver illustrates residual-water collection through low-point pickups while conventional bilge pumps remain in place.
Dryver shows the role of residual-water removal. The character action and boat layout are illustrative. Arid removes liquid at connected pickups; it does not dehumidify air, repair leaks or remove every cause of odor or corrosion. Existing contamination still needs appropriate cleaning. Discharge must suit the vessel and the fluid; water removal does not purify contaminated bilge liquid. View full-size image

Inside the system: air does the moving.

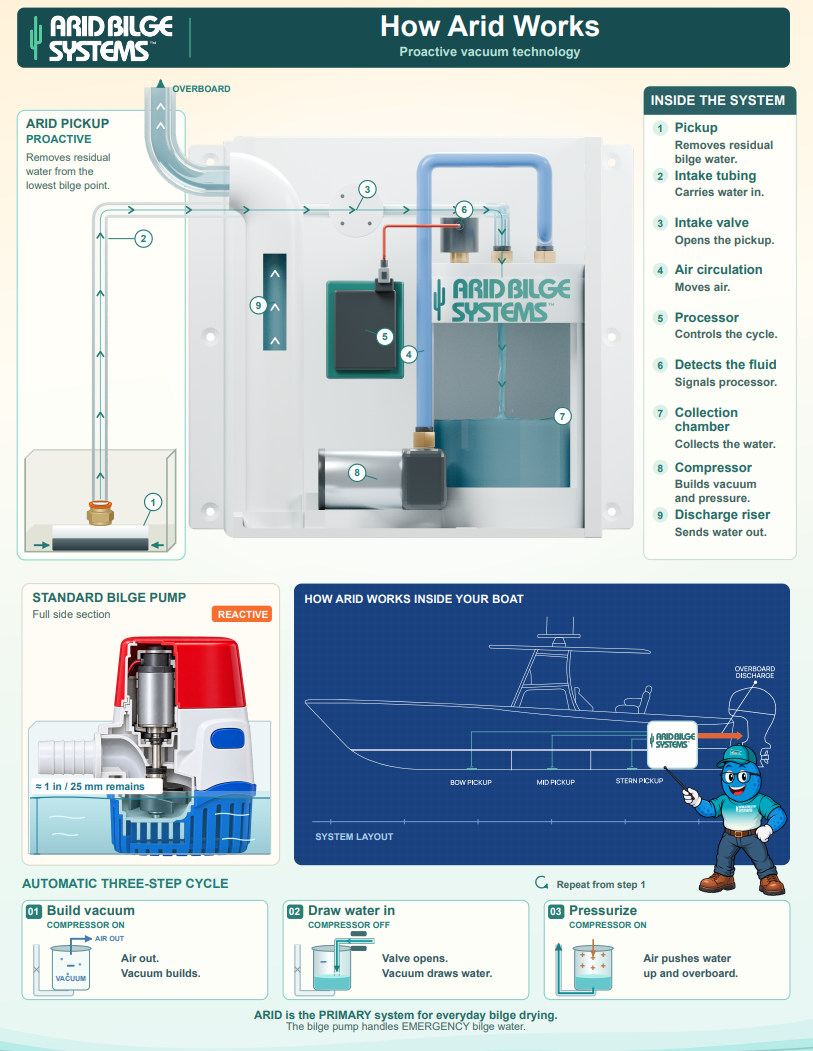
The compressor moves air, while the collection chamber handles the bilge fluid. Vacuum draws liquid into that chamber; air pressure then pushes the collected liquid through the discharge line. The diagram below shows this repeating collection cycle.

How Arid Works diagram: pickup, intake tubing, collection chamber and discharge, with vacuum, collection and pressure phases.
The operating principle. Vacuum collection and pressure discharge move residual water through the system. The drawing is a schematic, not a vessel-specific installation plan. Water left by a conventional pump varies with the pump and compartment; the pictured depth is an example. View full-size image

1. Build vacuum

The compressor removes air from the collection chamber, creating the pressure difference used for collection.

2. Collect liquid

The selected intake opens. Stored vacuum draws residual water through the pickup and tubing into the chamber.

3. Discharge

Air pressure pushes collected liquid through the discharge path. The cycle repeats automatically.

Why this design matters over the years

Moving bilge liquid in a collection chamber keeps the fluid-handling path separate from the compressor's air-moving role. That is the design principle behind Arid's approach to long-term bilge care. It does not make the system maintenance-free: pickups, tubing, connections and the system still need model-specific checks and care.

Service life depends on installation, usage, operating conditions and maintenance. The air-driven mechanism alone does not establish a fixed lifespan, guaranteed component life or a financial payback period. A reachable installation and a clear owner handover support continued care.

Arid complements conventional and emergency bilge pumps. Keep those pumps operational for their own duties. Explore how Arid works and how pickups are installed.

The Financial Case for Boat Builders

For a builder, the value is not limited to the cost of the equipment.

The larger consideration is whether a relatively small factory-installed system can help reduce exposure involving:

  • Electrical diagnostics
  • Corroded wiring and terminals
  • Moisture-damaged brackets and fasteners
  • Generator service
  • Thruster-related repairs
  • Gyro or stabilizer concerns
  • Repeat odor and dampness complaints
  • Dealer labor and customer-relations costs

Compare vessel-specific service quotations with the complete installed cost of the system. Whether any particular repair could be avoided requires evidence about the failure and its cause.

That does not mean every future repair will be prevented. It means the builder can reduce one persistent environmental risk: residual water remaining below deck.

What could moisture cost a builder?

A service visit can involve diagnosis, access, parts, labor and a return visit. The builder's share depends on the actual fault and coverage, supplier recoveries and the work performed. An owner may face inconvenience and maintenance expense; a dealer may spend time tracing recurring wet areas and supporting the customer.

Avoiding a genuinely moisture-related service event could have value. To call that a saving, however, the avoided expense must be attributable to residual-water management and exceed the system's purchase, installation and upkeep costs. These illustrations show how to frame that question.

Illustrative planning estimates, not measured Arid results.

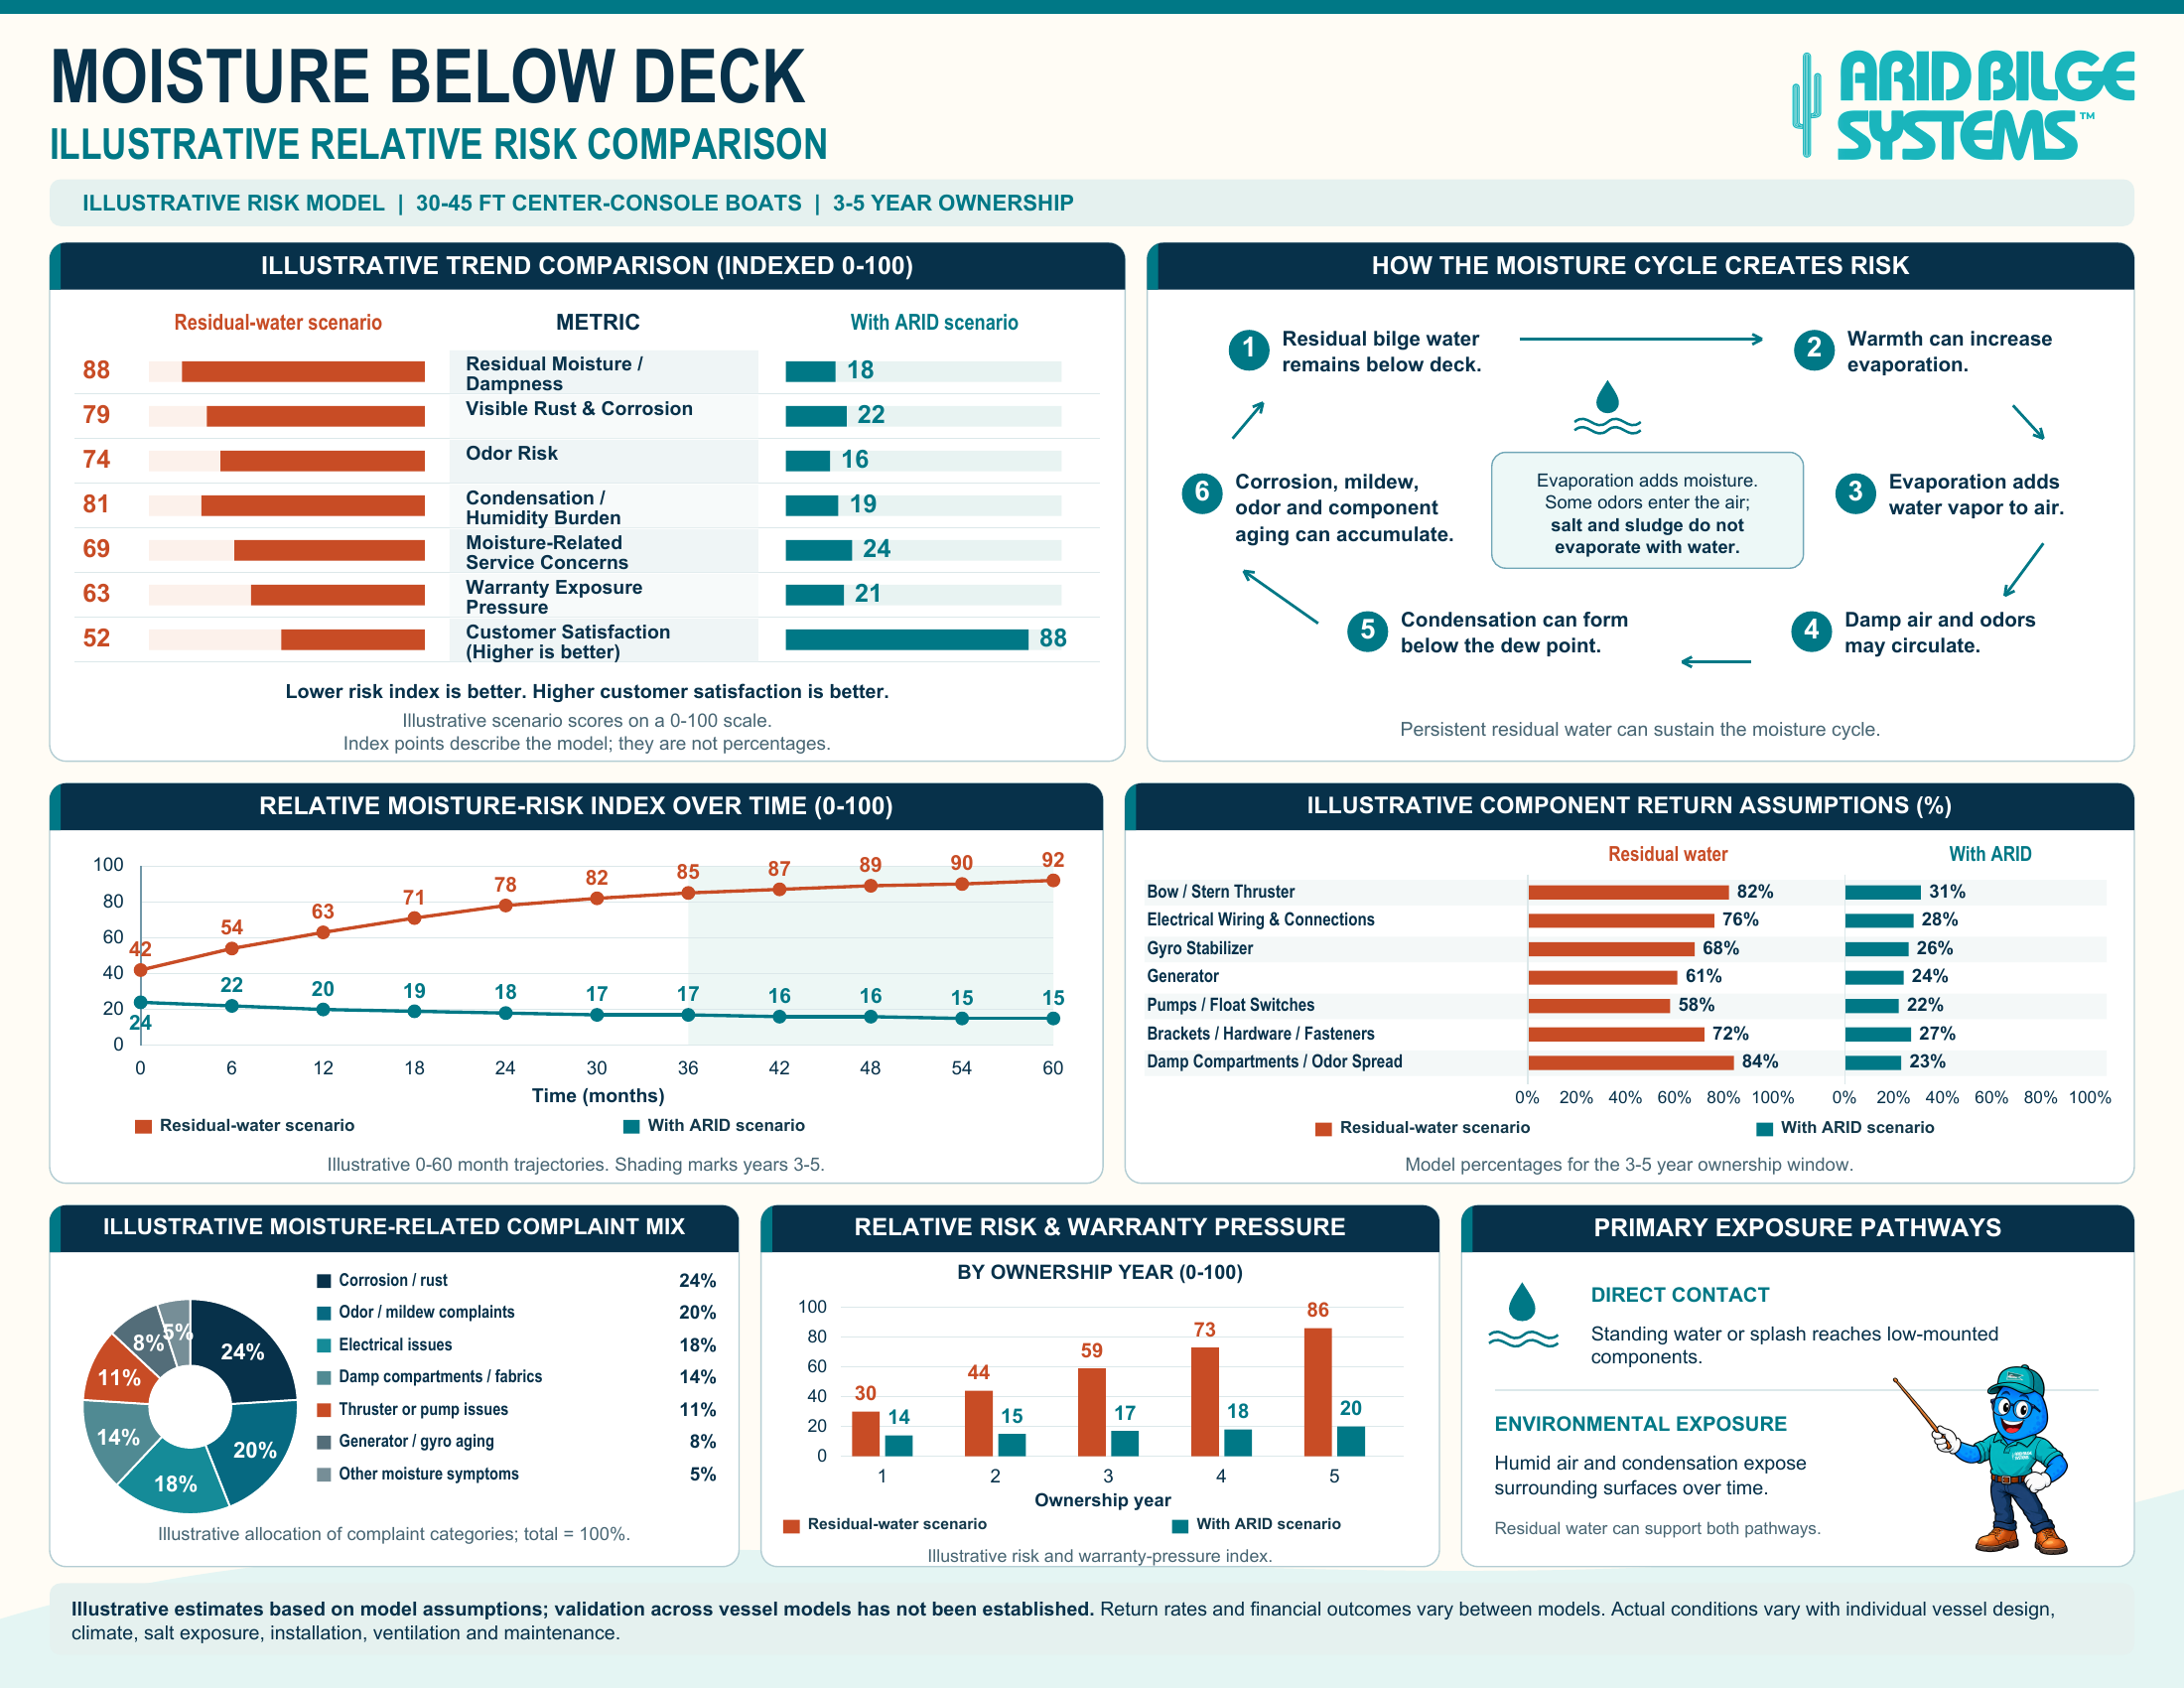
The supplied models assume 30–45 ft center-console boats over 3–5 years. Their precise scores, percentages, event counts and dollar inputs remain unverified. They do not establish actual warranty reductions, expected savings, service life or financial returns.

Moisture and component exposure

Illustrative relative moisture-risk model with assumed scenario scores, exposure pathways, component-return percentages and complaint categories.
Illustrative relative risk comparison. The 0–100 values are scenario indices, not probabilities. Component-return percentages and complaint shares are assumptions, not observed failure rates or customer-survey results. View full-size image

Service costs and the ownership calculation

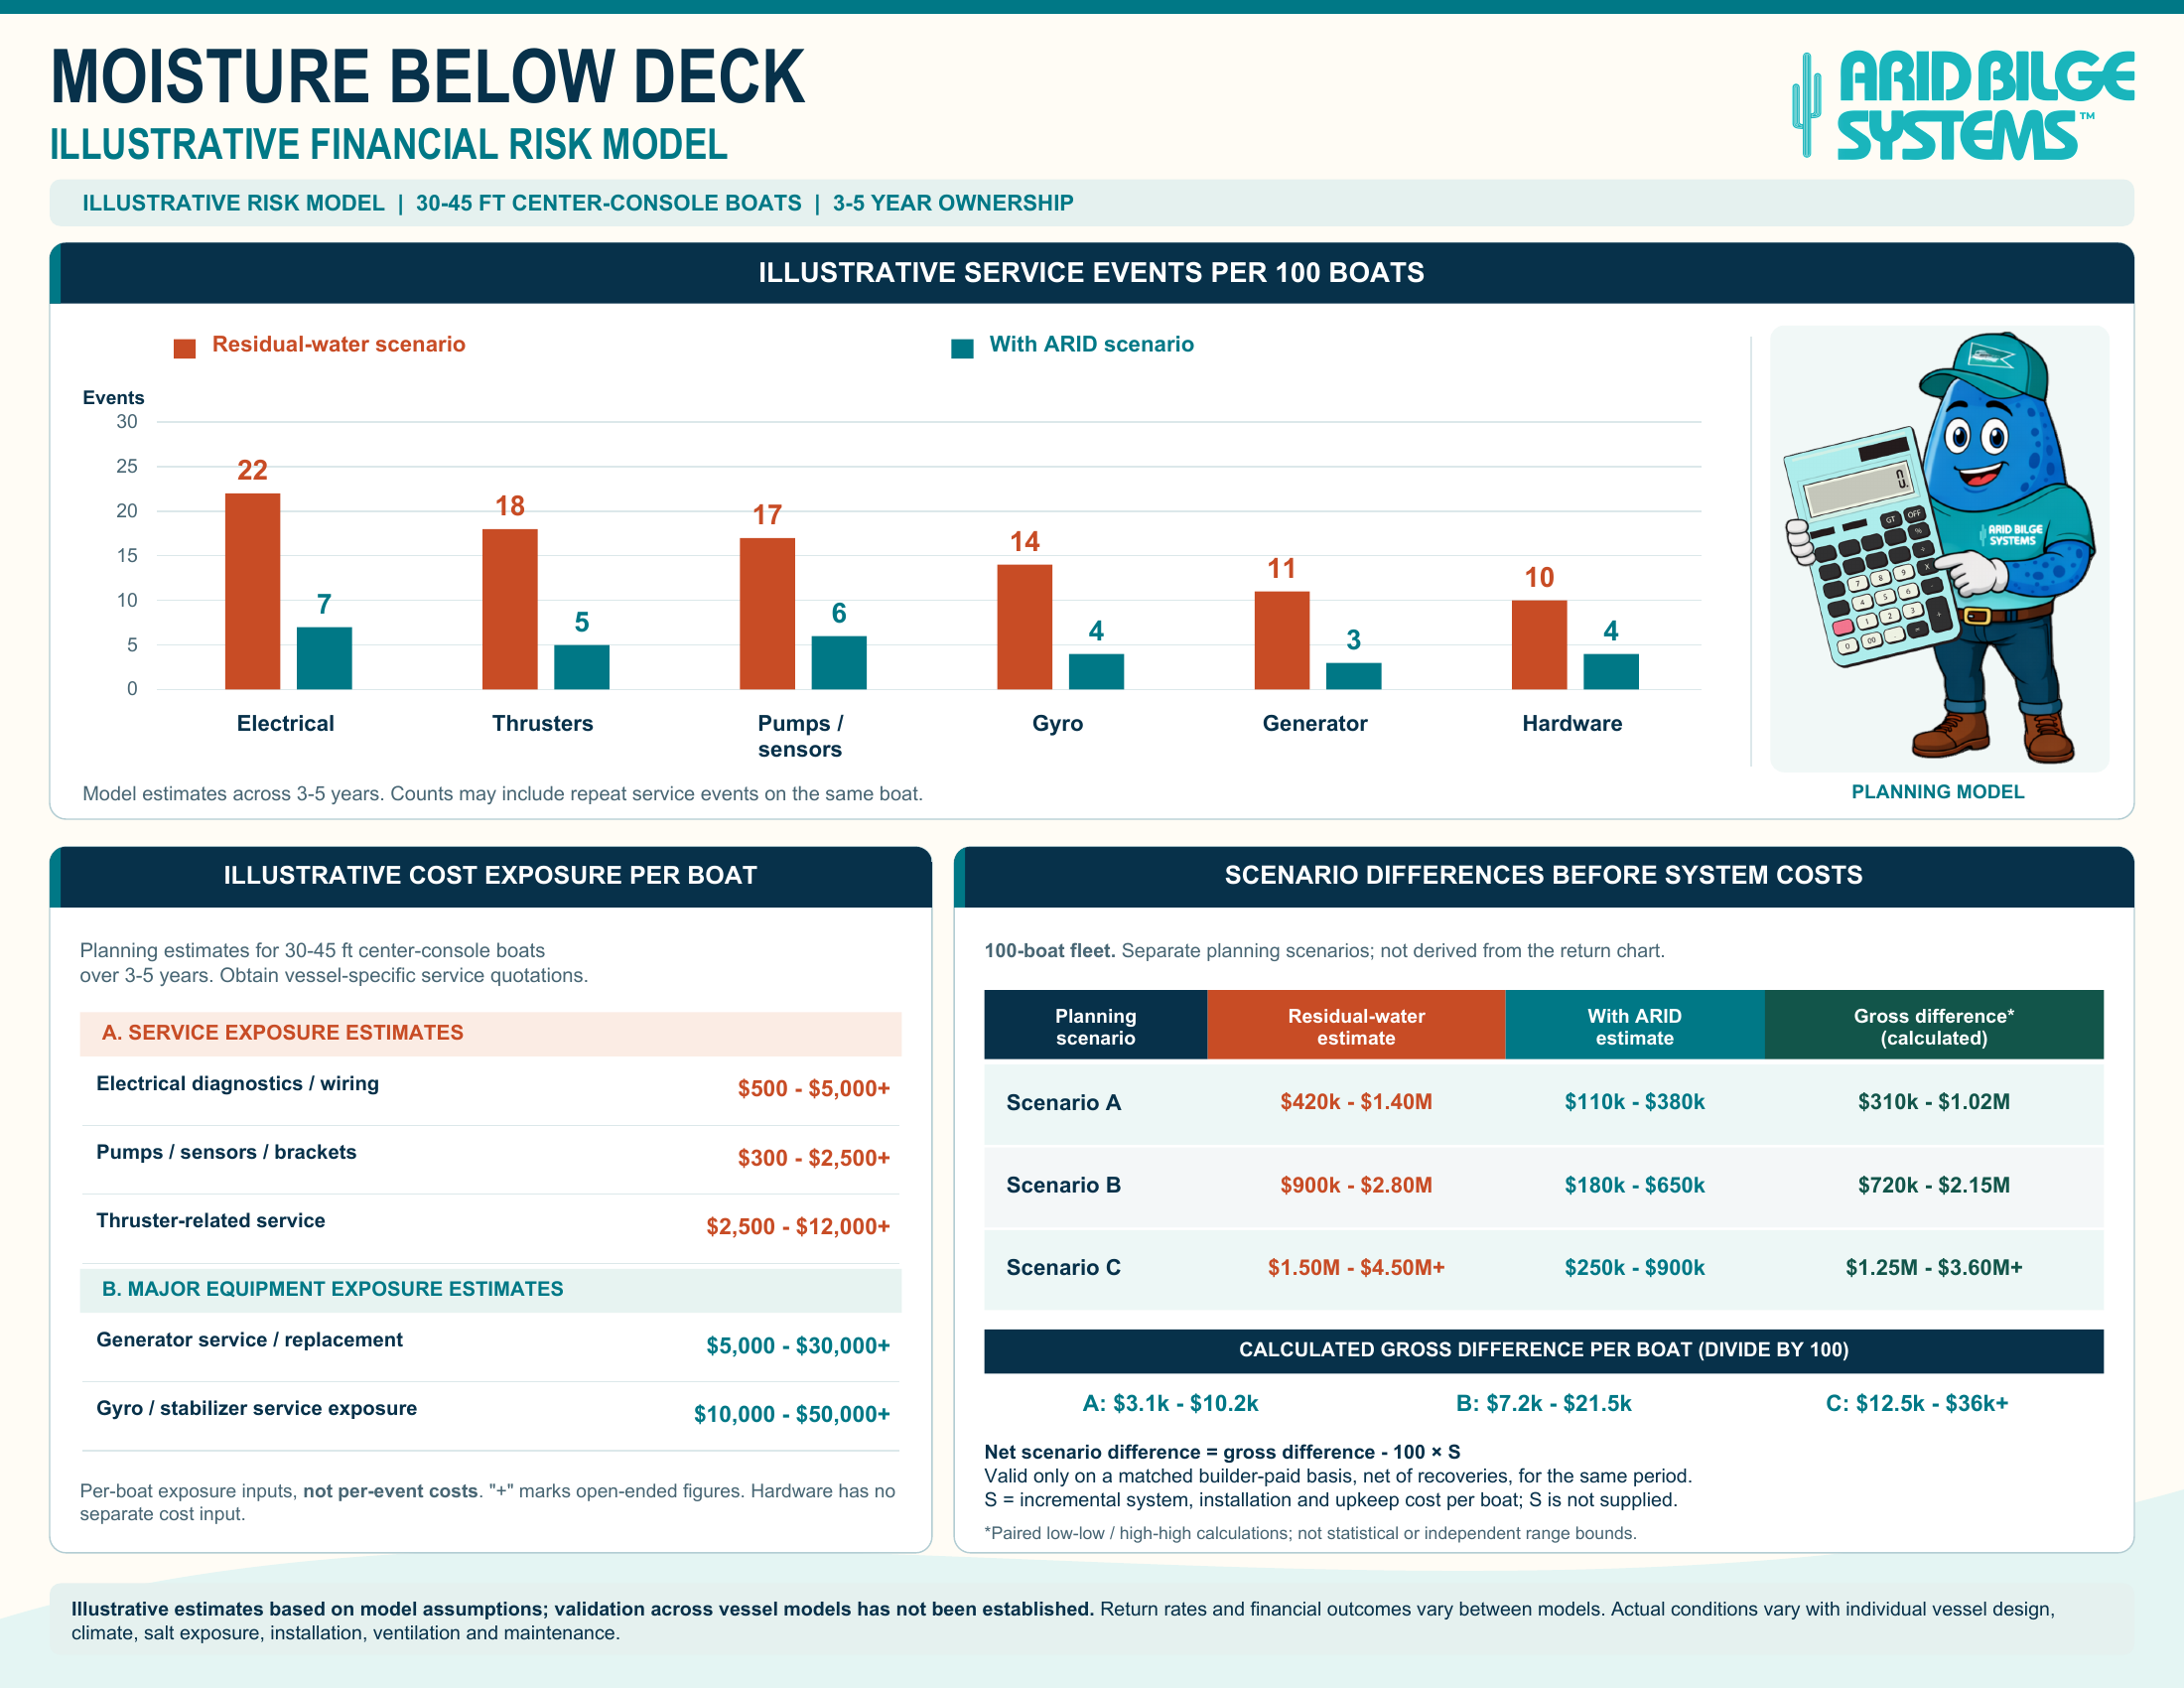
The financial sheet compares separate hypothetical 100-boat scenarios. Its gross differences are calculated before paying for the systems, installation and upkeep. The service-event chart and cost-exposure panel are separate assumptions; they do not generate those fleet totals.

Illustrative financial risk model with assumed events per 100 boats, cost exposure and gross scenario differences before system costs.
Illustrative financial risk model. These are unverified planning inputs, not repair quotations or demonstrated Arid savings. Repeat service events can occur on the same boat; per-boat exposure is not a per-event cost. View full-size image

Gross difference is only the starting point.

For example, Scenario A pairs $420,000 with $110,000 at its low end: a $310,000 gross difference across 100 boats, or $3,100 per boat. That is arithmetic on assumed inputs, not $3,100 of proven savings.

Net scenario difference = gross difference − 100 × S

S is the incremental system, installation and upkeep cost per boat over the same period. S has not been supplied. The gross comparison must also use the same builder-paid basis, net of recoveries. Without those inputs and attributable service evidence, net savings and payback remain unknown.

Read the model assumptions and calculation limits

The risk model uses 30–45 ft center-console boats and a 3–5-year ownership window. Its time curve spans 0–60 months. The 0–100 indices, complaint allocation and component-return percentages are supplied estimates. No measured dataset, sample size or reproducible empirical method validating these exact values has been established.

Financial service counts are events per 100 boats, including possible repeat events. Per-boat cost exposures are not per-event repair costs. Hardware has no separate cost input. The 100-boat scenarios are separate planning estimates and must not be reconstructed by multiplying the event counts by the exposure ranges.

The calculated gross differences are A: $310,000–$1.02 million; B: $720,000–$2.15 million; and C: $1.25 million–$3.60 million+. Dividing each by 100 gives $3,100–$10,200; $7,200–$21,500; and $12,500–$36,000+ per boat, before system costs. Low endpoints are paired with low endpoints and high with high; these are not statistical or independent range bounds. A plus sign marks an open-ended estimate.

Actual conditions vary with vessel design, climate, salt exposure, installation, ventilation, maintenance and use. A builder should replace the assumed figures with diagnosed service events, attributable costs and actual system expenses. Allocated overhead and fixed salaries are not automatically avoidable cash costs. Owner, dealer and builder costs must be kept separate so the same expense is not counted twice.

Build a business case from your own boats.

Record the wet area, diagnosis, work performed, parts and labor, time in service and who paid. Compare similar vessels over the same period, and record other changes such as ventilation or equipment updates. This helps distinguish a useful installation improvement from an unsupported claim that every future repair will disappear.

For an owner or dealer, the practical value starts with more manageable low points and easier inspections. Any longer-term financial benefit must follow actual experience. Discuss your vessel layout and a builder installation with Arid.

What It Means for the Dealer

Dealers benefit when the boat is easier to maintain and explain to the owner.

A dry below-deck environment can mean:

  • Fewer odor complaints
  • Easier leak identification
  • Cleaner service access
  • Less time investigating recurring dampness
  • A stronger long-term ownership experience
  • Another visible point of differentiation during the sales process

Dealers are also in a strong position to report recurring moisture patterns back to the builder. That feedback can help refine pickup locations, installation practices, and future vessel designs.

What It Means for the Owner

The owner receives a boat designed not only for delivery day, but for the years that follow.

Continuous residual-water management can help provide:

  • A fresher vessel
  • Cleaner machinery spaces
  • Better protection for surrounding equipment
  • Easier maintenance and inspection
  • Earlier visibility of developing leaks
  • Improved long-term presentation and resale confidence

A factory-installed dry bilge system should not be positioned merely as a comfort feature. It is part of a broader strategy for controlling the environment below deck.

Protecting the Boat Beyond the Warranty Period

A well-built boat represents its manufacturer long after the original warranty ends.

Owners remember whether the vessel remained clean, dependable, and easy to maintain. Dealers remember whether they repeatedly addressed odor, corrosion, dampness, and difficult-to-diagnose electrical problems.

Managing residual water from the beginning helps the vessel represent the builder’s standards in year eight—not only in year one.

Next Step

Arid Bilge Systems works with boat builders and dealers to review vessel layouts, determine wet-zone counts, recommend pickup locations, and develop factory-installation plans.

A proper evaluation should consider:

  • Vessel size and compartment layout
  • Number of wet zones
  • Pickup placement
  • System voltage
  • Tubing distances
  • Mounting location
  • Discharge design
  • Production and service access

To discuss factory installation, OEM integration, or a dealer relationship, contact Arid Bilge Systems.

Frequently Asked Questions

Factory installation allows the pickups, tubing, mounting location, electrical supply, and discharge arrangement to be integrated while the vessel is open and accessible. It also begins managing residual water from the boat’s first day in service.

No. Emergency bilge pumps remain essential safety equipment. Arid automatically removes the smaller amounts of residual water that those pumps leave behind.

No system can prevent every equipment failure or warranty claim. A dry bilge system reduces one important environmental risk by removing residual water and helping control below-deck moisture.

Water can evaporate in warm, enclosed compartments, increasing humidity and contributing to condensation on cooler surfaces. This creates a persistent damp environment around wiring, fasteners, brackets, pumps, and other components.

During construction, compartments are accessible, routes can be planned cleanly, and the installation can be incorporated into the vessel’s original design. Retrofitting may require more labor and working around finished structures.

10 08, 2026
  • Arid Bilge Systems Series 2 - installed and providing dry, protected service to minimize reesigual water damage.

Arid Bilge System Maintenance: An Owner’s Guide

By |2026-10-10T22:31:06+00:00August 10, 2026|Articles, Blog|

Arid Bilge System maintenance starts with accessible pickups, suitable cleaning methods and a record of normal operation. Inspect the pickup locations, remove debris, watch changes in runtime and keep the instructions for your model aboard.

Automatic fluid removal does not replace cleaning, leak repairs or checks of the boat’s conventional bilge pumps. A short, consistent inspection routine makes changes easier to notice.

Inspect and clean the pickups

A pickup sits where residual fluid collects, so dirt, fiberglass dust, paint chips and other debris can accumulate around it. Check the area as well as the pickup. Construction work, repairs or unusual contamination are reasons to inspect again.

Follow the cleaning procedure and service intervals for your installed model and pickup type. Remove accumulated debris, inspect the accessible intake surfaces and return the pickup to its intended low point. Keep its inlet clear.

Use the pickup maintenance guide with the current model instructions. A dirty pickup may be serviceable after cleaning; damage or a continuing restriction needs further attention.

Arid square pickups with tube fittings for inspection and cleaning
Inspect the pickup and the surrounding low point. Follow the cleaning method for the installed pickup type.

Replace according to condition

Inspect the pickup body, screen, fittings and other accessible parts for damage or deterioration. If cleaning does not restore proper operation, or a component cannot be securely refitted, consult Arid or the installer about repair or replacement.

Identify any cleaner or contaminant involved in an unusual exposure. Compatibility depends on the material and chemical; appearance alone cannot confirm that a part remains suitable.

Secure the pickup using the specified mounting method. Do not drill into it, crush it with a clamp or block its intake surfaces. Keep service access available after the boat is put back together.

Plan cleaning around the fluid involved

Remove loose debris and heavy residue before rinsing. Use methods appropriate to the compartment, its equipment and the installed Arid system. A residual-water system is not a way to dispose of sludge, trash or cleaning chemicals.

Heavy foam can interfere with operation. Follow the model’s instructions for switching Arid off before a major soapy washdown, clearing and rinsing the affected areas, and returning the system to service after the foam has cleared.

Arrange appropriate collection or permitted discharge for the fluid involved. Oil, fuel and contaminated rinse water need suitable handling; moving the water through a pump does not make it clean.

If a cleaner is needed, check its compatibility with the boat and system before use. Avoid relying on an unknown product or a strong mixture to solve an unexplained smell. Odor can come from contamination, sanitation equipment, leaks or other damp areas that need their own inspection.

Track changes in operation

Note unusual cycling, alarms or changes from normal operation. Check the connected area for returning water and inspect the pickup and tubing as directed by the model’s instructions.

On systems equipped with zone hour meters, record readings and dates. Compare the change over the same period for each zone and with that zone’s earlier pattern. Runtime can help direct an inspection; it does not diagnose the cause.

Our zone runtime guide explains how to make those records useful.

Keep labels and access clear

Match zone names on the unit, at the pickup where practical, and in the service notes. Keep a location photograph for hidden pickups. Label the electrical isolation point so the owner or technician can identify it before service.

Inspect accessible wiring and connections for changes in condition. Have electrical faults, corrosion or damaged wiring assessed by a qualified technician. Keep access to the central unit and its service points clear.

Installed Arid Series 2 unit with visible tubing and adjacent equipment
Leave access to the unit, tubing and service points when planning maintenance.

Follow the model’s winterization instructions

If the boat may encounter freezing temperatures, use the winterization procedure for the installed system and vessel. Include the relevant collection and discharge plumbing in that plan. Do not assume that a dry-looking compartment means every part of the system is free of retained water.

Keep the current owner and service instructions, zone map and maintenance record together. Give the installer the model, symptoms, alarms and recent service history when requesting help.

A practical inspection record

  • Date and location inspected.
  • Pickup condition, cleaning performed and any parts needing attention.
  • Returning water, unusual residue or changes in nearby equipment.
  • Meter readings, alarms or changes in operation, where applicable.
  • Repairs, follow-up actions and seasonal service completed.

Investigate unexpected incoming water and repair its source. Continue the boat’s conventional pumping, alarm and general maintenance checks alongside the Arid routine.